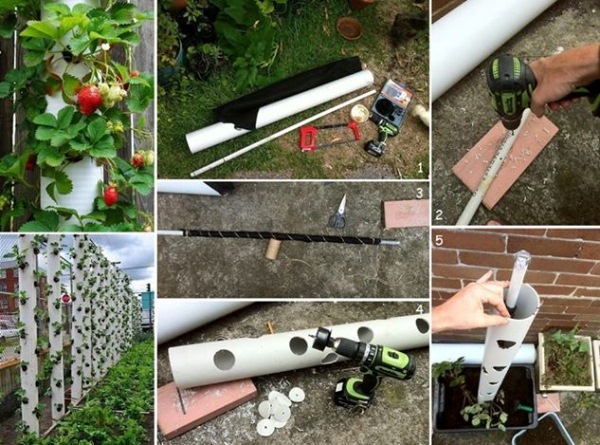
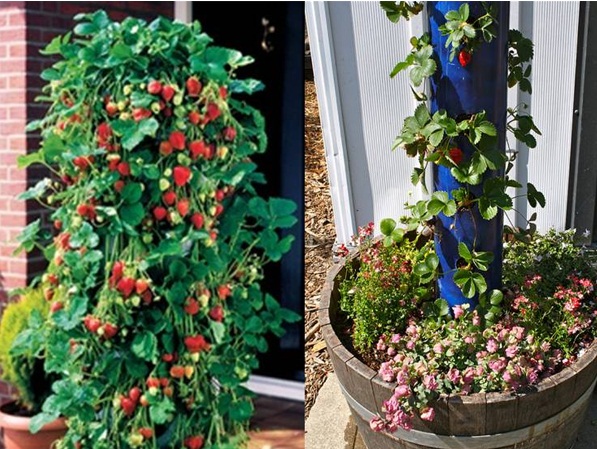
Vertical gardening is becoming very popular with urban, sub urban and rural gardeners alike. It saves space by growing upwards which keeps plant off the ground and out of reach from a lot of insects that can harm the plants.
You will need:
- An electric drill with a hole cutting bit that will cut a 5 – 7cm hole
- A 2 or 3mm drillbit for the watering pipe
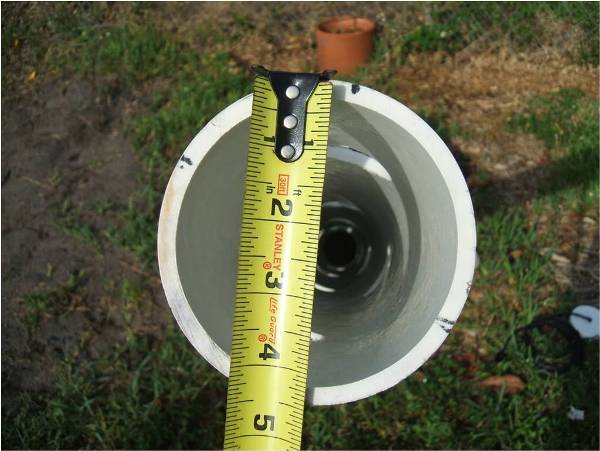
- A length of PVC downpipe 100mm or 150mm diameter. (The length will = the height of the unit)
- End cap for the downpipe
- A narrower diameter (15mm or thereabouts) length of downpipe for watering. Make it about 8 – 10cm longer than the downpipe. If you have a pressurised irrigation system, you can use a length of soak hose instead
- A cork
- A knife
- Duct tape
- A length of geotextile (or hessian would do) for wrapping the watering pipe
- Twine for tying the fabric to the watering tube
- Good fertile soil (test it if you can – strawbs prefer it slightly acidic)
- 1 litre or so of coarse gravel
- Strawberry plants (I used a mixture of different varieties)
- A few companion plants (nasturtiums or marigolds)
- Large tub or box (to stand unit in whilst filling)
- Fixing collar or ties
Step 1: Cutting
Decide on length of unit and cut the tower tube and watering tube accordingly. Don’t forget to make the watering tube 8-10cm longer! I made mine the height of the outside staircase outside as it gets pretty good sun there and the rails give me something to secure the unit to.
Step 2: Drilling the watering tube
Drill vent holes in watering tube. Only drill these in the top 2/3 of the tube as the water will run down to the bottom plants. If you put holes all the way down the upper planter won’t get quite enough water as it will all rush out the lower holes. If you think you will do a good job of capping off the base end of the tube, you can put one small hole at the bottom so it doesn’t go anaerobic in there.
Step 3: Completing the watering tube
Cut the geotextile or hessian to the shape that will cover the holes in the watering pipe. You don’t want roots getting in there and clogging it up.
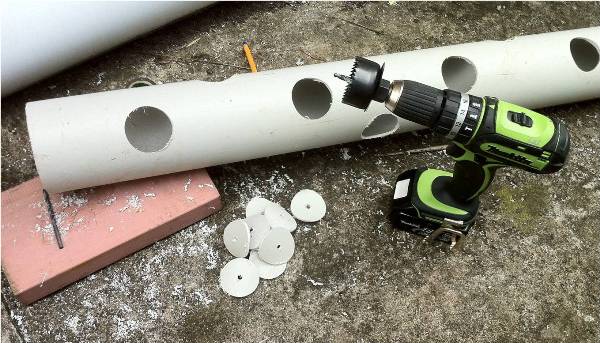
Step 4: Cutting the holes in the tower
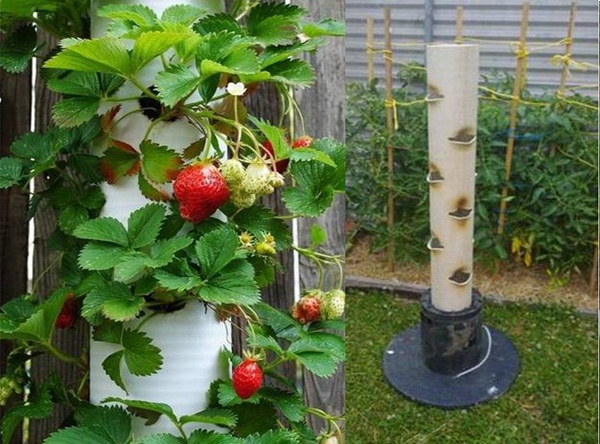
Cut the holes in the tower tube. Remember that one side will face the wall so only put holes on the surfaces that will get sunlight. I made 3 rows of holes and staggered them with holes about 20cm depth apart vertically. Leave the last 20cm intact with no holes. Some of this will be a reservoir of the lower level plants
Step 5: Filling
Place the large container against the wall – a corner is best so the tube is less likely to fall over. Place end cap over the base of the tube. Insert watering tube then fill the bottom 10 cm with coarse gravel.
How do you put the plants in?
Put the seeds in the holes.. and the plants grow up in it..
Strawberries don’t grow from seeds.
Yes, strawberries grow from seeds, it is the small kernels that are on the outside of the berry. 🙂
take that Wanda haha
“Strawberries don’t grow from seeds.”
Hahahaha! What do you think they grow from?
Go smack yourself, right now.
You must be smoking some bad weed , which also grow from seeds hahahah
fill dirt into the tube up as far as the first )bottom) holes. Stick the plants into those holes…fill more dirt until you get to the next set of holes…plants…repeat till you get to the top. And yes strawberries do grow from seeds but 99.9% of the time the grow from the runners (the little babies) that come off the parent plant. Don’t plant seeds….get plants.
Okay, but you did not finish explaining! Where do you put the soil and how do you get the plants in there! I am confused! Sorry, Newbie!
And where is the watering tube, I dont see it on the pics.
It seems pretty simple you would add the water pipe into the center of the pipe on top of the gravel ( personally I would add water pipe in center than put gravel in around it ) than put soil in to each hole add plant in that hole and put soil on top to next hole…you only add enough soil to get close to the hole than put plant thru hole from outside and add soil..you might want to tamp pipe each time you add soil to compact soil alittle ..
the water tube would go on the inside of the larger tube. fill bottom of larger tube with required gravel add dirt up to bottom hole, plant strawberry plant thru holes in the large tube, add more dirt till you come to the next hole, add another plant then dirt and work your way up to the top. I would assume you would water from the top of water tube and it would water the plants all the way down. My interpetation since they didnt finish the directions.
can you please explain this better? maybe a video? I dont understand some of the terminology.
So, I’m assuming that you put one plant in each hole? Any rec. on the kind of soil that should be used? Did you mix any type of fertilizer in with the soil?
what is hessian? is it a landscape fabric?
Hessian is another name for burlap cloth.
Ummm…..you do know how to work a Search engine, right?
How do you winterize them?
Any special care for winter time? Straberries plants going through winter when planted on the ground, but will they do ok in a straberry tube planter?
sorry: Straberries plants going through winter when planted on the ground are doing fine.
To winter the strawberry tube I would burry the tube in the ground a little and make a mound of dirt, mulch and then snow over top. They should do fine that way. More of a concern is how do the plants get nutrients with this little bit of soil. I don’t use artificial fertilizer.
There are plenty of ways to make natural fertilizer. google it.
очень познавательно применил в этом году очень понравилось.
Hi, i think that i saw you visited my site so
i came to “return the favor”.I’m trying to find things to enhance my web site!I suppose its ok to use a few of your ideas!!
I’m amazed, I have to admit. Rarely do I come across a blog that’s both educative and entertaining,
and let me tell you, you have hit the nail on the head.
The issue is something that too few folks are speaking intelligently about.
I am very happy I came across this during my search for
something regarding this.
A brief history In the Balenciaga Handbag
Looks quite simple. Probably wouldn’t hurt to anchor the pipe in the ground. Centre the watering pipe and add the gravel. Then fill the pipe with soil. Do not worry about plants. You can stick either seeds, or strawberry plants in the wholes once it is filled with soil. I think I will try this.
This really is an amazing idea. Space saving and much easier to harvest than bending over in the field. I must add it is quite beautiful too. Thanks for sharing this kind of information.
you could plant tomatoes like this too, they are running plants also.
Good idea, poor directions.
Where does the cork come into play? I thought the gravel goes in the watering tube, not the planting tube?
IN VERTICAL GARDENS, seeds are not used to grow, instead we use seedlings (small plants).
The photo shows burned pipe with lips pulled out on tube. Where are instructions for that?
This is a really good idea and one which obviously saves a lot of room and when the plants start to flourish (whether you choose fruit or flowers) it will look great and create a bush/tree effect as it blooms around the pole.
What i don’t understand is, how come so many people on here are asking how to do EVERY aspect of this project. It is so simple, why do so many think they need to be babysat all the way through everything.
PLEASE ALL START USING YOUR OWN IMAGINATION, YOU MAY BE AMAZED AT WHAT YOU ACTUALLY DO KNOW AND CAN DO.
This design is steller! You certainly know how to keep a reader entertained.
Between your wit and your videos, I was almost moved to start my own blog (well, almost…HaHa!) Wonderful job.
I really loved what you had to say, and more than that, how you presented it.
Too cool!
Really cool idea, definitely worth a try if you want to take advantage of your vertical space when growing.
Looks like a great idea, but is PVC safe? Will any plastic chemicals leach into the soil and plants?
I may try this
I’ve tried to “Pin” this to Pinterest, but it won’t let me saying that it leads to “spam”. You might want to contact Pinterest to have this corrected.
anybody with half a brain can figure out how to do this. The pictures are numbered and go with the numbered instruction.
1) Cut pipes to length & drill holes (small pipe small holes, big pipe big holes)
2) cap big pipe on one end and place in container if using larger pot add soil to outside of pipe, place in sunny location
3) cover little pipe with some burlap or other material, cork one end, duct tape on top end (keeps out soil while filling).
4) insert small pipe in big pipe, place some gravel in bottom (helps with drainage)
5)Add some good fertile slightly acidic soil until you get to a hole, add seedling, add more soil repeat until filled.
6)place strawberry seedling in to of pipe.
7)plant complimentary plants in outer pot.
8)remove duct tape, water, wait, enjoy
Strawberries wouldn’t overwinter well in this below zone 7 due to freeze/thaw periods. Might have to put fresh plants in every spring. Young plants fruit best, anyway.
I like the idea and will try it – this reduces getting “slug” on berries
1- I have mainly used “runners” from existing plants to get new ones,
2- the best strawberries I get are from the second year plants.
3- the Soil with mess (Burlap) with still compress some.
4- If there is compression, the plants will slide down and cut off the good growth.
Maybe ‘disks’ could be secured inside the Main tube to stop sliding???
5- only 270 degrees of the pipe with give good growth but so what.
6- this will require automatic watering every day – No deep root system.
How would you exchange the soil the next year so that it would be enough nutrients in it? Would I have to take the whole thing apart every year?
Brilliant idea. How many hole in each tube
What kind of fertilizer is good for strawberries?
Por favor pueden también escribir en español.
Than is not the same as then !!
Se plantar o morango inteiro ele nasce,pois os pontinhos pretos nele são sementes.Falo porque plantei e ele está lindo,nasceram vários pezinhos de morango.
Slugs will eat corn meal and it will kill them ! I just built 2 of these . I drilled 2holes in the top and ran rope through it to hang on fence . Can” t wait to try them .
Muito bom
Very shortly this web site will be famous among all blogging
and site-building people, due to it’s nice articles