Copying Mother Nature might be kind of difficult, but if in the process you manage to help it less polluted, it is worth it. Not to mention, you will impress with your DIY art project. These are the materials needed to make a plastic bottle lily flower from recycled stuff:
• a pair of scissors;
• three white bottles;
• one yellow bottle;
• a lighter;
• a piece of fringed paper;
• (optional) some glue;
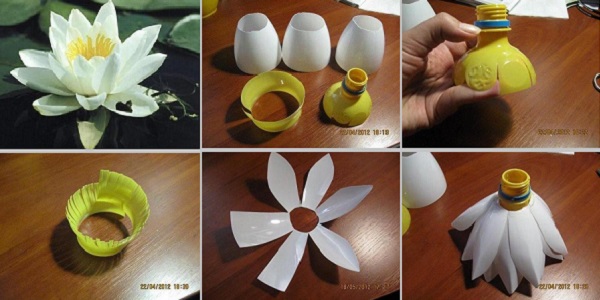
You ought to start by fashioning 3 hollow cone shapes from the white PET. Then, cut off the head (top side) of the yellow bottle and with the help of a scissor, cut petal-like shapes into it. Check to see if your work matches the one in the photo. Next, use the lighter to round up the `petals` and actually give them a natural look.
Now, you have two options. Either you cut a middle piece from the yellow bottle and fashion it into a shredded spiral, or you use a piece of fringed paper which you might have in the kitchen or from Christmas, and place it in the middle of the upside-down bottle. Then, take each white cone and cut petals into it, like the ones in the picture; be careful not to cut them off, because you will need another bottle for that.
Finally, place each cone with their `petals` intermingling on the neck of the yellow bottle. You can secure the top non-petal part of them to the bottle with a bit of glue, just to make sure. When turned upside down, it looks like a beautiful lily flower. Congratulations! You saved the planet a bit and maybe inspired someone to do the same.
 source: www.pinterest.com