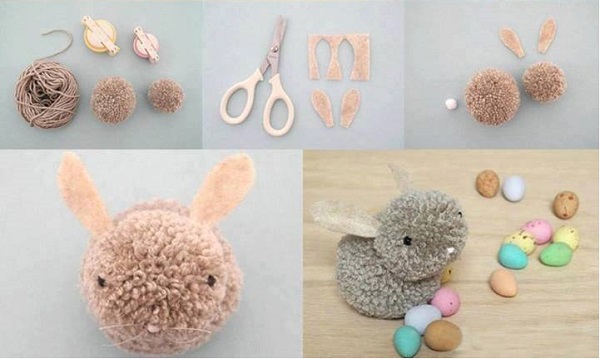
This year, try to involve kids into decorating the home in a proper Easter way. The theme of spring and bunny rabbits will light up every child’s face. Toys will achieve that in a fast way too! So why not combine decorating with toys and make a DIY Pom-Pom Easter bunny. Here is what you’ll need:
- a couple of Pom-Poms;
- pink embroidery floss string;
- yellow embroidery floss string;
- a piece of felt;
- glues;
- a pair of scissors;
- needle and thread;
- (optional) ribbon;
Begin the project by winding some of the yarn around two fingers and tying a piece of Pom-Pom in the middle via waxed thread. Next, use the scissors to shape the body Pom-Pom of the bunny and the head. These should be a couple of ovals. Fashion the ears by cutting the pieces of cut felt. Attach them to the head with the help of some glue. Stick the beads on as well. For the nose, you have to pass pink embroidery floss through the middle of the face (head), make use of a bead and sew it into the Pom-Pom. Clip the whiskers if necessary. Finish making the bunny by gluing the Pom-Poms together and tying a ribbon bow around the neck. Done!
 source: Martha Stewart