A cold weather needs a warm remedy! And one way to care for yourself in times of chilly weather is with the help of a pair of mittens. Learn how to make in just a few minutes some mittens from an unused sweater. The process is fairly easy and the images really speak for themselves. Grab these materials:
• a wool sweater;
• marker;
• a pair of scissors;
• straight pins;
• sewing needle and thread (matching the color of the sweater);
• buttons, additional embroidery floss;
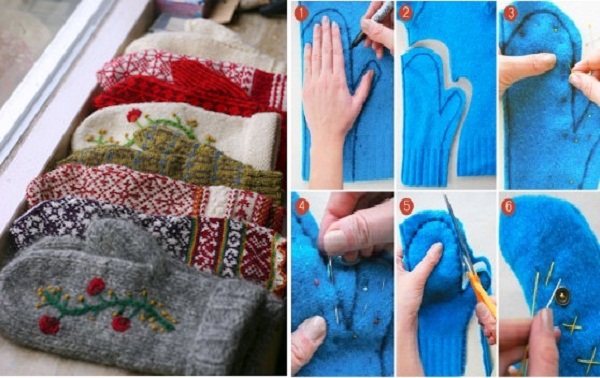
Start by turning your sweater inside-out and outlining your hand with a marker on the lower part of the front of the sweater. Using a pair of scissors, cut-out 1″ above the shape. Place some pins along the entire length of the outline. This is important because the two sides (remember that you cut on the entire sweater, meaning back and front) will stick together.
Sew a simple stitch along the trace, making sure the bottom is left open and wide enough for your hand to fit in. By now, you can remove the pins. Continue the process with cutting the excess material around the stitch, remembering to do this far enough from the stitching so it won’t open.
Finish by turning the resulting mitten inside-out and decorating according to your taste. Buttons or colorful embroidery floss will do the trick. Do the same steps for the other half of the wonderful DIY mittens out of a sweater.
How to Make Sweater Mittens Out of an Old Sweater
photo credit: cremedelacraft.com









Thank you so much for this idea.
My late MIL also used wool coats and made mittens.As a child of the depression it was a real need for her to upcycle EVERYTHING she could. She took adults clothes and cut them down for her children. Girls were very well dressed!
I had a VERY well dressed doll as two of my aunts upcycled their old clothes to make new ones for her and nearly 70 years later I’ve still got the clothes. A horrid cousin broke my doll :(.
Do you need to felt the wool first
Yes.
You CAN felt the wool first before you cut them– it makes the wool more dense. But you can do this pattern without felting, you just might want to use a serging stitch when sewing the seams.
Just make sure not to make the mittens and THEN felt them as they’ll then be child size! 😉
The ones I have seen are lined and could be a bit more complicated. I would like to have that pattern.
Hi, I’ve done lined Christmas Stockings in one piece and I would guess this might work along similar lines. When you do the mitten pattern, do a mirror image adding a half inch seam in the middle (at the wrist) where they would join. Make sure that the thumbs are both on the same side. BEFORE you sew the mitten together, sew the wool outer mitten part and the lining part together at that half inch center allowance you made. You should have a mirror image mitten with wool on one end and your lining at the other, joined in the middle. Do the same for the other piece and then assemble as instructed in the directions for the single mitten above, with one small change. Leave a 2-3″ gap unsewn together so you can turn it. Turn the mirror image mitten piece so the seams are on the inside and then stuff your lining piece up into the outer mitten piece. You should have a lining piece that perfectly fits into your wool piece, Hand stitch the turning gap closed.
how do you felt wool? what exactly does that mean…i love this idea but seems like an important step and i dont know what that is….is it what makes it fluffy? if you wouldnt mind, would you explain the process if its not too detailed, i dont want to take up to much of your time! thank you much! i love this! great easy(i think) gift ideas! 🙂
to felt the wool, wash the sweater in hot water and then put it in the dryer on high heat. it has to be 100% wool.
in addition to the explanation above, here are a few tips on felting
1. it is important that the sweater is agitated in the hot water. if your washing machine has an agitator you’re fine; if it’s a newer one you’ll have to do some rubbing in the sink by hand
2. put the sweater in a zippered pillow case before washing to prevent the wool from leaving fuzz balls all over your machine
3. Google felting for some great videos on what to do.
Good luck
For the newer machines you can still do it.. Put in a couple of tennis balls while washing, they help with the friction..
felting also makes them much better _as_ mittens, as it increases the density and warmth of the wool. This is such a great project for possible distribution to the homeless as well – Michigan winters are mean and hands are so susceptible to frostbite
Thank you, Judy! I was hesitant at first to go through the “felting” process as I tend to be a “hurry up” kinda crafter, but your post made me see the light! I want warm mittens! ♥
Felting wool is just washing it in hot water and they drying it. Which you don’t want to do after you make your mittens. So if they need to be washed after they are worn it needs to be in cold water and hung dry.
How to Felt Wool
Felting wool requires three conditions — heat, moisture and friction — which can be provided by your home washing machine and dryer. Here are a few tips for successful felting.
Use a hot-water wash, a cold-water rinse, and the usual amount (per load) of whatever laundry soap you have on hand.
Set your home washing machine for the load setting that will allow free movement of your goods, but don’t use too much water or they will float at the top and not get enough agitation or friction. If you desire a thicker, more shrunken finish, wash the sweaters in a load with your regular laundry. The weight of jeans and towels agitates the wool and enhances the felting process.
Dry the sweaters in the dryer on high heat. This step tightens the felt further, and sometimes makes felt that lacks body become full of it!
If, after one cycle of washing and drying, you still haven’t achieved the desired felted texture, try repeating the process one or twice more.
After your sweaters have felted enough to hold a crisp edge when cut, remove them promptly from the dryer, smooth them out, and stack them flat to store until you’re ready to use them. This keeps wrinkles at bay and the need for ironing to a minimum. It also allows for maximum visibility of your material palette.
I have bought many of these type mittens in the past at craft fairs, not all of them were felted, so I think it may be a judgement call depending on the sweater.
Will this work for front load washers?
thanks!
to felt anything containing wool, you put it into hot water and it will shrink up and become thicker. It is not a necessary step. You can do it if you want it thicker and less likely to run. It is sometimes done when making hats, gloves or mittens to make them warmer and so they will not shrink much more. It makes them smaller which is why it must be done before cutting out the mittens. this does not call for it–and it only works if the garment contains wool. If it is acrylic, it will not shrink down to become felted.
This would work with nice thick fleece as well, if it has a knit band at bottom. Otherwise, you could add a couple bands of elastic to create a cuff.
Great idea! I was just thinking with all the cold weather we’ve had that gloves just don’t protect your fingers–they get so cold being separated from one another. Mittens are much better but adult mittens aren’t as cheap as gloves. This is better; it’s FREE!
Gotta do this. Got a pair for Christmas with fleece lining. Easy enough to figure out. Sweater is inside out to begin with, put same size fleece over both sides of sweater and sew as specified, turn inside out and you’ve got a fleece lining. You could put fiber full, between the layers, the sky is the limit for customizing this.
I have made these and they are wonderfully warm! I do shrink the wool sweaters first so they are extra thick, and line them with a cotton lining.
Don’t you have to felt the sweater first?
I had this pattern years ago and lost it. Thanks! Makes great mittens for charity and for mitten drives. I used to make children’s sizes to give away.
I have made these, but I all so do a diff. pattern as well that is lined. This pattern is tricky, use scrap fabric to make a pattern that fits first. I allow 2 inches not one or they seamed to run tight. and the wrist, ALLOW enough room to put your hand in. if you make a pattern out of scrap first you can adjust as and where needed. then take a brown paper bag, trace the pattern on there so you all ways have it. I all so added a inch and took away inches to make more sizes, cut out on brown paper bag. I then made copy’s of the pattern I put in a file if I need it latter. good luck.
Do the same with some old flannel, sew together for lining! Extra warmth.
I’m told that not to use flannel for the lining, doesn’t have the stretch that fleece does
II have seen these mitts in Moncton N.B. and loved them so much I bought a pair for my Granddaughter for Christmas and now I can make my own THANK YOU THANK YOU
These mittens would be so warm!!
Would have loved to read this article but the moving popup ad kept blocking the infomation and there is no way to close the ads… Poor design.
AdBlockPlus is your friend, Tom.
Agreed. I love AdBlockPlus.
There is a way to close the ads. There is always an “x” somewhere that will close it and it will ask if the ad covers the page or you want to stop seeing this ad. It usually closes the ad in about 5 seconds or less then.
Bonne idée! Je vais dire a Page pour quelle peut faire ceci avec ses éleves.
Merci.
This is a great idea I’ve been doing for years using old coats and other things I find that would work. My great Grandma used to put bread bag wrappers between layers to make them waterproof. I imagine there is better material for that today…lol…. I do make some long enough to go over their elbow and put elastic at the wrist and elbow. This grandma hasn’t made them in a long time. Time to get out the machine again. Thanks for the reminder. Nice Job!
I have a pair of gloves that were made with plastic between the layers. What I havefound is that my hands sweat, then become freezing cold as the sweat gets cold.
If you have PUL material to put between two layers of wool sweater, then these will be more waterproof.
If the sweater is 100% wool, the mittens will be warm, even when wet. I have had MANY pairs of wool mittens over the years and worn them x-c skiing or even on cold river trips and they keep my hands warm, wet or dry. I love wool!
I wondered if using an old coat that is waterproof would work for making gloves especially for kids for being out in the snow. those type of gloves/mittens are so expensive and kids are always losing one of them. if u could use an old coat they would be warm and protect them from getting wet as well. something to try maybe.
Great idea. I would suggest adding a long pretty ribbon on each mitten so they can be threaded thru the kids’ coats so the don’t lose them.
What a great idea! There is such a need for warm mittens in the cold weather we’ve been having. Why not make it a social occasion and get together with a few friends to make a batch of mittens for a local shelter or community health care center?
When I made these I boiled the wool sweater first to shrink it and I used the arm cuff for the mitten cuff. So warm, some I lined using old wool long johns. Lol 🙂
I also line mine with fleece!
I would think you could do this for a hat as well. Make a matching set!
I have not made these but I have bought them after someone else made them, and yes I believe the wool has been felted.
Thank you for this great idea.
Bonjour j’aimerais savoir comment pour le poignet vous faite pour que sa tienne bien mettez vous un élastique car ce n’est pas toujours des chandail fait dans le style avec des genre d’élastique dans le bas alors en faire une paire a un enfant elle seront toujours entrin de tomber ! Merci ? !
How do you keep them from running or unraveling???
I think this is a great idea.
Could you then use the rest of the sweater for a vest? I say this because some of the sweaters I’m thinking of have been worn out at the elbow. I would think that since the sleeves are sewn at the shoulder, could just unravel what is left of the sleeve and have a sweater vest.
I am going to reinforce the palm and inside of the thumb with some thin leather so they don’t wear out. I had a pair like this I got from a craft fair. Driving and other winter things eventually wore them out. This way I can have them for a good long time! I will also use the sweater sleeves for mittens!
Can you use sweaters that aren’t wool? I’m very allergic to wool and can’t wear it even if it’s lined.
You only need to use wool if you want felted (“boiled wool”) material. Otherwise you can use any other material. The boiling shrinks the material and makes it s very close knit. Germany makes grea felted jackets.
When I used a man’s XML sweater the sleeves can be used th make a pair of small child’s mittens also.
Great idea I canfeel my hands getting warmer already.
Great idea! I am a Girl Guide leader and will be doing this with the girls as a group sewing project. THANKS
Use the rest of your sweater to make a matching hat, the back of the sweater should measure the same circumference of your head. Measure up at the side seams and cut up to about 11 inches from the bottom edge. Do the same to the other side seam. Cut from one side to the other to make a rectangle. Sew the sides together and gather the top with a blunt tapestry needle with yarn. Fasten off the yarn and turn inside out.
I have bought these type of mittens in the Moncton area but they were lined with fleece!
Wool itches me so bad I can’t stand it. Is there a way (I imagine so) to line these with flannel or whatever?
That is my picture on the right, I have no idea how it ended up here 🙂 Those mittens were all handknit by me, some were felted afterwards, but none of them were made from felted sweaters.
Sorry, that is my picture on the *left* I meant of course….
I recognized your picture! I was just about to complain! Those are NOT sweater mittens. I remember reading your post and being delighted by your knitting prowess.
Does one sweater only make one pair of mittens?also do i trace one mitten from one side of sweater and other mitten from the other side ?what i mean by this is can i trace them beside each other or do you just use each side of sweater,? Please help ty looking forward to making these 🙂
pinterest won’t let me pin this as it says the link leads to ‘inappropriate’ content. =O
So, to felt whool, you just do what you’re not supposed to do with your whool sweater ?
Great! Thanks for the tip!
A good place to get sweaters is your local thrift store.. 🙂
Great Idea, I began sewing and crocheting at age 7. My grand daughters are 9 and 10 and very interested in doing creative projects. They’re out of school the whole week of Tgiving. We got something to do besides Minecraft!!!!
I’ve done these for years with clothing my children out grew.
I have an awesome tip to make these even easier.
I was making them for my kids so we traced their hands (about a 1/2″ from hand) on the backside. The next step is to staple a few staples around each mitten instead of pinning.
Then sew on the traced line around the mittens.
*After* you’ve sewn the two sides together cut the mitten from the fabric.
Stapling works great on knits, keeps the knit from unraveling.
Sewing before cutting from the mitten assures the integrity of shape and pattern.
I also use recycled tissue paper on the feed dog side to avoid snags. It’s easy to rip out after sewn.
Just a head’s up, it looks like Pinterest has blocked this post.
I’ve used this type of mitten for years as liners for leather overmitts. Farm supply stores sometimes have the overmitts with their glove selections. Then I can change the liner as they get damp, or if the weather conditions call for a different weight of insulation. Gloves do not keep my hands warm, must have mittens!
does it have to be a wool sweater. am allergic and would love to make these.
would not be hard to figure out a patern for slippers using the same basic process would it?
For some reason Pinterest is blocking this article.
Love this idea!!! Thank you so so much!!!
I am going to try this this weekend, I think I am going to add a large “buttonhole” on the palm side, so your fingers can slip out the top if necessary. Thanks for the post…. now to find some wool sweaters!!
I would recommend to use a backstitch instead of a running stitch to sew the two halves together. It is more endurable.
How do you line them?
I wonder if buying a super cozy fleece or similar fabric from the store and lining the mittens with that would make them super cozy? I’m trying to think about ways to waterproof them… maybe a thin layer of clothing that fishermen wear or something of the sort? I most certainly LOVE this post and so thankful for you posting it!! It’s the easy things that make you go crazy… Why didn’t I think of that!! 🙂
please add me to your emailing list. thanks.
please add me to your emailing list. thank you
First time watching you. LOVE your smile and energy. Great teacher. Thanks.
I love what you do, please send me more of your patterns and designs
I would think it is “safer” to sew first and the cut outside the stitching. That way you don’t have to worry about the knit stitches unraveling.
use a sweatshirt…warm, will not ravel, bottom has ribbing, or for a small child use the sleeve.
I’ll watch for more of your creative ideas.
If you sew 1/4 from the edge so you are not close to the edge, it will not ravel. I also did a second row of stitching next to the first. Try to not use sweaters with a loose weave. A smaller tight weave works the best. I used fleece for a lining in all I made. It has nice stretch for comfort. I probably made 60 to 75 pr. It was a lot of fun and everyone liked them.
Felting….that was the term i was looking for. I remembered a friend had a pair of these years ago. I knew there was more that made those mittens amazing!
I made these and they turned out really cute, but I suggest making your mark larger than your hand so they’re a little more roomy than tight and also so you can cut away the marker as permanent marker isn’t permanent on wool apparently & rubbed off on my hands. I used alcohol on a rag to rub off what I could & hopefully that will take care of it.
Please add me to your mailing list. I love your patterns and iseas
Best place to find sweaters for making mittens is at rummage sales and thrift stores. Look at men’s , ladies and children’s. The ribbing from sleeves and bottom edge of sweater are great fork making writers for the a mittens. Make linings for mittens by using soft fleece that has some stretch. Use same pattern as used to cut mitten from sweater..
Please add me to your email list.
Felting is when you take a felting needle and stab an area repeatedly. As you jab at the fabric, the fabric becomes less porous. As a result, the material will be more compacted, denser and warmer. It also helps with shaping. There are videos on YouTube for felting.
Have to remember, just tracing your hand does not mean ONE SIZE FITS ALL. I find the thumb cut is not DEEP enough. If you have nails, that poor thumb gets mangled. My family of people have long fingers, not big hands. I have made a variety of patterns…And fabric composition makes a difference on adjusting size when you make as well. PRE SHRINK everything.
These could be made for our koalas with burnt paws from the bushfires
Wow.
That’s a surprise