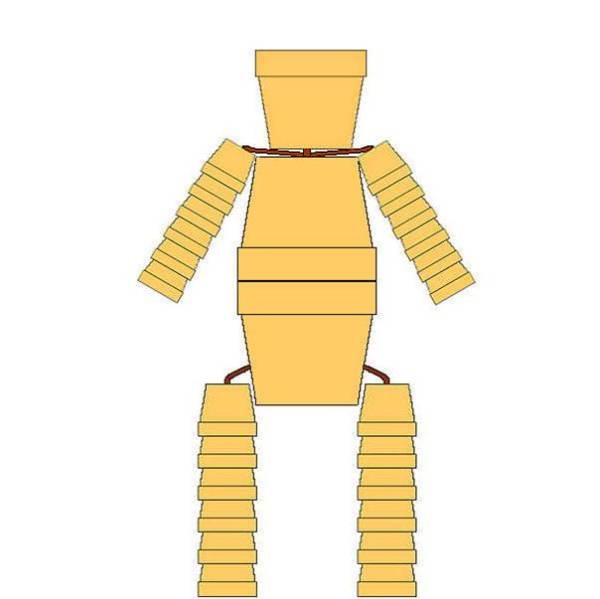
Clay pots are not just for plants. They can be used in a unique way that will definitely transform your home garden into the envy of your neighbors and friends. Take a couple of minutes to make yourself this creative flower pot man. It can still store one plant, as it were its hair, but the purpose of this creation isn’t how useful it can be, but how much it can impress visitors and viewers alike. Here are the materials needed:
• 27 flower pots with different diameters: a dozen 6-inch – for the arms; a dozen 8-inch – for the legs; a couple of 12-inch – for the body; and one 10-inch – for the head;
• 12 pieces of 3-inch thick Styrofoam;
• strong wire;
• wire cutters.
Instructions: make holes in each of the pots and pieces of Styrofoam. Be sure they are large enough for the wires to go through, but small so as knots won’t be able to cross. Repeat the knotting procedure after each pot and foam you alternately go trough; just imagine you are making a sandwich. Leave room in the wire for the joints. Use the images as guidelines if you like. When you reach the body part, it’s important that you position your flower pot man in the place you want it to stay; it’s pretty difficult to move it after you complete it. It’s recommended you make each half of the body before assembling them. For the inside of the body (with the 2 big pots upside down each other) you won’t need Styrofoam. Place the head-pot and free your imagination. Decorate with plants, paint or whatever you feel like. And, it’s alive! The flower pot man or woman.


Really like it
I like chicken
Thanks so much for the great instructions. I was almost ready to begin a small pot child, but did NOT know about the styrofoam. Thank you again.
i have been collecting plant pot men n ladys usually buy 1 when a grandchild was born then oh no none available i have now just bought 4 but i am going to custermise them as i have 2 grandaughters and 4 grandsons and 3 step grandsons i hang them in my conservetory with a dream catcher
Appreciating the time and energy you put into your site and in depth information you offer. It’s good to come across a blog every once in a while that isn’t the same unwanted rehashed material. Excellent read! I’ve bookmarked your site and I’m including your RSS feeds to my Google account.
Where do you put the strofoam?????
Please help
I can’t find the instructions to make these. Can anyone help
I have all the supplies I need, but am having a difficult time drilling the holes into the pots. I have a dremel tool, a regular DeWalt battery operated drill with all the attachments, “concrete” drill, etc., but it just seems to take forever for the drill to go through the clay. I am even soaking the pots in water for a day or two like one site suggested. I noticed not all of yours have been drilled, but rather, the rope/string has just been run through the pot and knotted somehow.
Any suggestions for me?
Thank you!
I would like to know how you
I would like to know how you made the holes in the pots. Please advise. Thank you
all you show is an already put together pc. and the materials,but no step by step to show where you add the syrofoam and how you drill the hole’s. so I don’t find this helpful in any way. you need to be more detailed.(not Happy)
What kind of paint do you use
does anyone have a pattern
for the girl dressattern
How do you make the faces so cute. Please advise how.
Thanks
Have you ever thought about creating an e-book or guest authoring on other sites?
I have a blog based on the same topics you discuss and would love to
have you share some stories/information. I know my audience would enjoy your work.
If you are even remotely interested, feel free to shoot me an e-mail.