At first sight, this magnificent outdoor garden decoration might be confused with an artist’s sculpture. Evoking an almost Zen-like ambiance, the Concrete Garden Hands are used to both improve the design of your garden and fulfill a useful mission as a planter. In the DIY world, everybody is like an artist. You can make every day-to-day item almost from scratch in any manner you like to. This is a short tutorial on how you could also make a garden sculpture with concrete. Here is the list of necessary materials:
• a pair of rubber or latex gloves;
• concrete;
• concrete acrylic sealer;
• surgery utensils (tweezers, scissors);
• safety glasses;
• a brush;
• (optional) coloring;
• (optional) old cloths and rags;
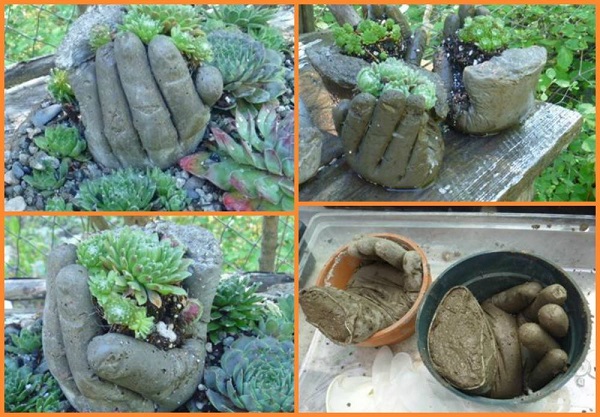
![]()
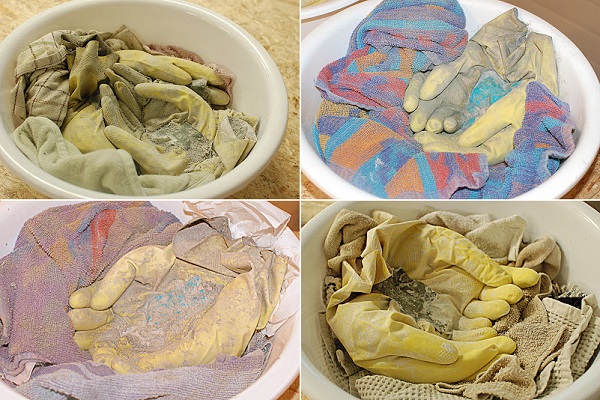
The trick you have to remember when beginning this type of project is that concrete doesn’t act like clay. If you want a smooth piece of decoration, you will want the concrete to be a bit on the dryer side when you mix it up. This way, it would stay in the small spaces (i.e. fingers of the glove). Now, mix the concrete and add any coloring if you want. Take the gloves and slowly pour the concrete into the cast. Position the gloves into the desired position, preferably into a bucket filled with some cloths (in order to help you with the final shape) and leave the concrete to cure for a couple of days. Then, remove the rubber with the tweezers and scissors. Please remember that this step requires patience! Finally, apply a coat of the sealer with a brush and you’re done.


Good article, thanks.
can’t wait to do this, it will look great in my garden
I want to do this for a birthday present, but it’s kind of last minute (2 1/2 days away), how long does it take for the cement to cure and be ready to be removed from the gloves?
How do you get the fingernails and wrinkles to show if you just pour the concrete into the gloves?
you don’t. they’re cheating, that one was done with clay
that is what i was wondering too! lol
I was thinking you could try this- draw nail lines on the outside of the gloves before filling. Once filled and partially set, take a small stick, like maybe an orange stick (used in manicures) and “draw” over the lines to make an indented line in the concrete. Just an idea. It is difficult to imagine due to the outside of the hands being face down while it is curing.
I am going to turn gloves inside out, use a glue gun and outline nails and knuckle creases, turn them back inside right then fill. not sure if its gonna work, but sure sounds like it might!
Great idea!!
You could take a dremel tool with a grinding bit to do the nails, Walmart sells dremels for under $40 and they can be used on wood, cut nails and metal and grind dogs toenails… they are a wonderful tool.
Would this not leave you with 2 separate pieces? I would assume you would need to make an extra step to use cement glue or more concrete to adhere the 2 “gloves” together once you remove the rubber. Am I wrong?
hi I was wondering the same thing Stacy.!!!! If you get the answer how they are together please please let me know, and thanks. lol
A different site showed slicing the filled gloves open at the point you want them to join and then press the exposed cement together.
Once it starts to set you can slit the outer side of the hand and join the two gloves together before it dries completely. 🙂
these planters look like they were cast from actual hands because of the wrinkles in the hands and the Well defined fingernails. I don’t think this was made from pouring cement in rubber gloves.
I agree -plus what Stacy said – please add to the instructions DIY & Goodshomedesign!!!
I think you’re right. How do you get all of that detail? Cement hardens to much to do that.
Think it would work if you let the cement harden a bit then do the sculpting of the nails and knuckles on the outside of the glove? Might work.
Your correct, wait until the cement has set up but not until it is compleatly hard, then you could add the details your wanting to it. I do alot of work with cement statues and things,including repair and rebuilding work for people.
A hand held dremel with a grinding bit would sculpt out the nails but you would need goggles.
i agree with becky. it would work if you had patience and actually took time to bend the fingers too. then you could get the llines referenced to.
the nails and wrinkles are all made from the outside
You can buy impression material at Hobby Lobby or any craft store. You mix up the impression and cast your own hand, when set about 2 minutes take hand out of impression and pour cement into mold. Impression material removes easily
Sure, like the gloves are going to leave imprints for fingernails and lines on the knuckles. There is not one picture here of the final product following these directions. It looks more like a headache… good luck trying this one and having any decent results.
The last picture shows that it was done with the gloves. Come on people doing the nails is the easy part
Trying to pin this project, but Pinterest says the link is blocked because it may lead to spam. Would love to be able to pin this!
These directions will not give you the articles pictured. Pouring the concrete in the gloves doesn’t produce the fingernails and the creases on the joints. Would love the full directions.
I don’t get it; fingernails and knuckles wouldn’t show up if I poured concrete into gloves – only if my hand was molded, right?
How did you form fingernails ?
Hi there…
How do you get the look of wrinkles and fingernails in the hands please
How do you get fingernail & such details??
But how did they get the imprints of the finger nails and other lines and such by just filling of the gloves?
How do you get the fingernail and knuckle detail that you have in the first two pics? Gloves by themselves won’t do that. A hand cast would, but I don’t see how gloves would.
how or when are the fingernails done?
It’s a neat idea, except that almost all of the hands you are showing as the completed result have fingernails. There are no gloves in the world that are going to give your casting fingernails. Which makes me think that those photos are totally misrepresented. You will not get hands that have the natural finger creases at the knuckles that hands have, either. I saw at least one of your photos shows that, as well. You will get hands that look like they are wearing gloves. When you show a product that is not achievable with the procedure you are suggesting, it is called misrepresentation and false advertising. I would suggest to use ONLY photos of the actual results of the process your instructions describe, and not other photos of other things that are not achievable with the process. Just saying..
en fait pour lui je ne sais pas trop Mais pour moi voici ma méthode : le ciment ce comporte comme le plâtre quand sait le préparer donc inutile de faire un prés moule directement le béton dans le gant et le poser de façon a lui donner sa forme , une photo de ma part serait mieux explicative , ensuite je démoule 2 jours après et je sculpte les formes ongles etc . autres méthode en plus simple : prendre un plat y mettre du plâtre a staffeur , avoir bien badigeonnait sa main ou ces mains de vaseline ou autre pour les retiré ensuite facilement et te voilà avec un moule . bien apprêtait de démoulant tu pourra t’en servi plein de fois . une fois sec le ciment adhère très mal au plâtre mais bien l’ apprêtait c’est plus sur quand même
But how do you get the finger nails?
How do you get the fingernails? I didn’t see anything in the description to explain how to get the realistic fingers.
I think get the nails by carving them. That is the best I can guess!
Perhaps a step was left out to make a cast of your own hand.
The first two finished product photos were not made this way! They have fingernails and joint wrinkles which latex gloves would not have.
How did you get the nails and wrinkles on the fingers in?
How do the details of fingernails and knuckles happen? The gloves don’t have those details……
At what point do you add the impressions for fingernails and knuckle joints?
how do you make the fingernail markings? is there still some setup left in the concrete after you take off the gloves that you could carve out the finger nail beds?
not sure, but don’t think latex glove mold will give fingernails and appropriate wrinkles. We’re 1st 2pics made by another method?
How do you get the fingernails. Gloves DON’T HAVE FINGERNAILS.
I can’t figure out how you’d get the hands together and make them stick if they were in their own glove
And it would be cooler if they were really BIG hands, any ideas for where to get really BIG gloves?
They’re not showing the whole process.
First, poke holes in the gloves every inch or so to remove air bubbles when filled.
Next, fill a bowl with rags to shape the hands into a curve, a couple fingers up, whatever you want.
Then mix concrete (or plaster of Paris can be used and can be purchased in smaller quantities).
Put glove over the top of medium sized vase and rubber band on.
Then fill gloves and lie on surface, using your gloved hands to spread mixture to ends and squeezing out air.
Next make a slit on inside edge of each glove. Push out some cement to hold hands together. Cover this spot with plastic wrap and put something on top to hold this down.
Shape in curve or whatever happen you want hands to be in.
Let sit for 24 hours and remove gloves. This requires patience. Use sharp knife and tweezers.
Paint or not, put about 1/2 cup or less soil in them and then add legumes, moss, etc.
I think these will make great Christmas gifts!
Fingernails? Do you need them when they’re open hands and the nails are down?
Hope this helps.
hola! y tu sabes que tipo de pintura puedo ocupar para pintar el cemento? y despues poder lijar un poco para que quede con un estilo envejecido?
necesito saber el paso a paso y con que pinturas hacerlo!!
muchas gracias!
Yeah, I’m not buying this at all. The latex gloves don’t have fingernails or knuckle wrinkles. The photos with those details are obviously not made with concrete or by simply filling the latex gloves.
how did you get the detail of wrinkles and fingernails?
They would not turn out like these photos at all so it is a bit misleading. The hands in the photos have obviously had much more detail put into them than you will get from a pair of rubber gloves! Check out the detailing of fingernails, cuticles and even the wrinkles on the knuckles. Do not expect to pour concrete into rubber gloves and get very smooth detailed lifelike hand back or you will be severely disappointed. If however you like the rustic look, you will be fine.
So how do they get the fingernail impression.
How do you make the finger nails on the finished project? Thanks
The pictures don’t represent the end product. They are unrelated. Those ones are made with crafted molds and not elastic gloves. The ones made with these instructions will not look like any of the pictures and most likely be a huge dissapointed.
Perhaps I am missing something — I do not understand how pouring concrete into the rubber gloves will result in ‘my hands’ complete with fingernails and joints — obviously there is a step that I am not understanding and do not know how to access through this article. It is a lovely idea and I would really like to make several of these.
How is the detail acheived?
The figer nails, the knnucles, etcetera?
Those details would not come from a pair of rubber gloves.
Would very much like my finished product to resemble the ones in your article.
🙂
Thank You!
How did you sculpt the fingernails and the details? They are not in the gloves… Thanks!
Susan
So how do you get the detail of the fingernails and knuckles?
How do you made the fingernails?
thats great…but, the only one that actually looks like it was done with gloves are the first pics. How do you get the fingernails and detailing such as the smooth hands and wrinkles at the knuckles??
Thats because the first pictures are the ONLY ones that were made with the gloves, the rest are comparison pictures to what a sculpture does with clay and molds! this post is all about how you can make something yourself that LOOKS like something else.
how and with what did they carve the finger nails?
Thank you for the post, I think I will attempt this and see how it turns out.. This is a good IDEAL TO MAKE AN GIVE AS GIFTS …
How do you get fingernails printed on the hands?
How do you get the finger nails and knuckle creases?
Looks great but gloves do not have fingernails. You left off the step to carve the fingernails!
How do you get the fingernails and knuckle wrinkles if you’re using gloves for molds?
How did you get the nail impressions and knuckle wrinkles on the cement?
I didn’t see how to get the details. Fingernails, knuckles.
How do you get the detail of the fingernails and lines on the knuckles?
How do you make the fingernails and knuckles? Do you carve them in after?
How do you get the nail details? Can the concrete mix be carved after it sets? Is there a special mix for the concrete?
Cute but how did you get the nails and creases in the knuckles?
I love this idea, but I didn’t see instruction on how to make the fingernails. These look like real hands which won’t happen with latex gloves. Do you then do some scraping for nails and knuckles? If someone knows, I’d love to hear.
Hire did you do the fingernails?
My best guess for the detail of the nails, would be to use your hands in a clay type material, and then use that for your mold. You may have to slice it in half, to remove your hands, but its easy enough to put back together, then fill with your concrete. We used silica sand with our foundry, but that wouldn’t work well for this. But the clay would.
My best guess for the detail of the nails, would be to use your hands in a clay type material, and then use that for your mold. You may have to slice it in half, to remove your hands, but its easy enough to put back together, then fill with your concrete. We used silica sand with our foundry, but that wouldn’t work well for this. But the clay would.
Measurements And direction how to make nails
I have done something similar to this with wax, but you get all of the details of your hands. Dip your hands in wax and let it dry. Repeat this until you have a very thick mold that can support the weight of the cement, and carefully take your hands out of the wax mold. I recommend doing one hand at a time. Make sure you keep your hands in the position you want the mold to take. Fill the mold with cement. Wait 24 hours for it to dry for the best results (the longer you wait, the better). You can either chisel the wax away or melt it off in the oven (in a glass bowl). Now you have the details of your hands.
Yes, how did you do the fingernails?
the final picture is the one with the rubber gloves, no finger nails etc and you can see the crease of the rubber gloves. I woukd say the otgers are done with plaster of paris and a mould taken, and then pour cement into the mould.
Please can you let me know how to carve the details into the concrete?
If you want to do a sculpture like these you have to create a mold first. Using gloves definitely will not show the detail these pics do because they aren’t real hands. You can go to a craft store and buy a hand kit meant for babies (you may need a few of them) and that will give you the mold to then pour the casting compound into. I make Wax Hands and often use those as a mold. You will get every line and detail when you cast it.
HOW DO YOU MAKE YOUR WAX HAND MOLDS?
Same question about how the fingernails and wrinkles are formed?
I really want to make these but want to know how to make all the detail? Can’y do that just pouring into gloves? Like the two handed too but how to make??
These comments are hilarious!
Doesn’t ANYONE read comments already posted, before they comment themselves?!
Obviously not!
There are almost 4 dozen comments asking about or commenting on the fingernails and/or wrinkles! Is that really necessary? Wouldn’t one person asking the question be enough? Apparently not….
Omg….thank you for saying something, it was driving me crazy too, like they don’t read the same comment a million other times….wow.
People are crazy. It’s not hard to figure out. Make the molds, cement them together and use a drummer for the nail and knuckle details people…. not to difficult to figure out really?????
Thank you, Ricardo! I marveled, too, at how many people posted the very same question that dozens of people already posted. That’s all I’m going to say…
You have to make a mold of your own hands using plaster of Paris to get the exact impression of your fingers,nails,etc. then use concrete to pour in and make your planter. I don’t understand why people leave out key steps and cause others disappointment. If you do the first step it will turn out just fine. Oh , FYI…I’ve never seen any latex gloves with finger nails, or skin indentions before.
Thank you Greg the plaster of Paris good idea to get all details of the hand will have to try this
I would think you would have to use a sharp object after the cement starts to set-up and indent the fingernail on the outside of the glove, then when you remove the glove might have to use a dremal tool and sand it. The knuckles I would think is the way you lay your glove position
and the creases, the same, use a sharp object and indent from out side of glove after it starts setting up
??? IDK
Any tip as to finger nails and knucles were achieved
last thought, after the cement starts to set-up, cut out the glove around the fingertips and make the indentions before it sets up hard???
I think it would be better to get the kit used to make the kids hand prints at a craft store. The plaster gel that actually makes the hand imprints. Then treat it so it is water proof. This just isn’t giving enough info.
notice they dont answer this question about nails and knuckles
Make that “questions”, questions asked by dozens and dozens of people who, oddly, have failed to see that dozens and dozens before them have asked the very same question about the nails and the knuckles.
The photos are misleading, not at all in line with the directions given.
to get the nails invert the gloves and glue acrylic nails where the nail grows…presto…turn the gloves back and pore the cement slowly…
Not only does this NOT produce the detail in the hands as in the photos, the fingers would not be adjoined as there is rubber from the gloves between each one!
Fingernails? How
The only way to make these planters is to make molds of actual hands, then pour the concrete into the mold. There is no way you can make a finished product like this by pouring concrete into rubber gloves.
I also would like to know how to get the fingernails,knuckles and how to connect the hands together. It looks very interesting and I would like to make some.
For those of you that are wondering how to get the details, how about you flip the gloves inside out, hot glue gun nail shapes to the tips of the fingers, and on that same side, glue gun wrinkles for the knuckles. Let dry, and flip back and proceed with the directions above.
I believe they are showing you how you can make a set of hands with the gloves, but the hands with the finger nails and lines in the knuckles are only an example of what you can make yours like without the knuckle lines and finger nails,andt you would make yours without the knuckles and fingernails. You could cut the rubber gloves away from the nail area and the knuckles area after a few hours of drying while the concrete is still damp enough to carve on it and carve the Knuckle lines and fingernails into the concrete before it drys completely by using an ice pick or a pencil for a carving tool.
l hope this helps everyone. Use your imagination people.
Ok for one don’t use a lot of water, let it sit for at least 5 hours slowly and very carefully cut and remove gloves then take a toothpick and make wrinkles removing the loose cement. Same with nails, then let dry completely and then I finished it up making the nails smooth with my dremel. Good luck 🙂
isn’t one or a few asking about the fingernails/knuckles enough?!!! 😀
Here’s the deal everybody: the first 2 images are designer planters. The 1st as you can see from the size ratio to the bricks is very large- this would require making a sculpture and then creating a mold of it similar to how garden gnomes are produced. The second planter is smaller but made the same way as the first- you can look closely and see that it was poured as a single piece as there is no seam where the hands connect and the way the top rim is not a complete finger. The third planter that looks like gloves is the look that would be achieved by this project simulating the designer planters- there will be no knuckles or finger nails and you will have 2 pieces that are not watertight. In theory you could glue the two hands together but think about when you scoop up water- it leaks through the spaces between your fingers and between your hands- the planter would likely do the same thing so you would have to line it with an additional layer of concrete inside once glued together and you would be left with a very small space for planting hence the super tiny succulent plants in the third picture and the dirt spilling from around the thumb. Hope this helps to clarify that this is a case of stolen idea and lack of honesty from the author!
You are absolutely correct! Pinterest simply must do a better job of deleting content that is obviously inaccurate
wow I can not believe how many people are not reading this article and making snide remarks about the finger nails and details! READ people! The pictures are not misrepresenting anything here! The pictures are comparing what you can do yourself in comparison to what sculptures do with clay!!!! OMG! Its very plain to see that the ones with finger nails are sculpted and the ones made with the gloves are NOT. Geeez. But if you really want to it wouldnt be that hard to take a dremel and do the details. You can also very easily see that the sculpted ones are MUCH larger then the ones you would make with gloves. WOW unbelievable.
PEOPLE!! This person is showing how you can make something similar without having to buy them and spend a ton of money.
So, you can spend a ton of money as the last 2 pics or, you can make your own without the fingernails!!
I think its super cool even without the nails.
YOU DON’T GET THE NAILS WHITHOUT BUYING THEM ALREADY MADE!!
Ok ladies I think I figured out how the did the nails and knuckles at least this is what I would try. On the gloves I think after they are filled I would wrap the little hair rubberbands around where the knuckles would go and for the nails I would carve out of balsa wood and glue them into the gloves. Really like this but it will take some trial and error to get it right.
MzBz, I think you could just purchase fake nails and glue them inside the gloves. My husband, who is a sculptor with clay, suggests making a mold from plaster of paris and then pour the cement into that. That should give you the detail you’re looking for.
Where are the real instructions. Put pictures and hint at how its made why was the money can’t be finished like that.
i would think that you could wait until the clement is almost dry and use a sharp object to make the imprints thought the gloves, like you would when in a sidewalk
The finger nails and the lines and wrinkles can be done after about 12 hours after pouring the concrete, it’s not easy and you actually have to place the gloves in such a way that you can do it without moving them. It can be also be done after it’s done with paint and shadowing but it won’t come out as good.
Good Luck.
The bottom picture represents the project. The other two are just what he’s trying to replicate in a simple DIY method.
You use a dremil tool to make the fingernails
I think when the hands are partly dry is when you have have to make finger nails and knuckle creases yourself ,and yes they should’ve showed that part.
How do you do the nails and wrinkled
the wrinkles/knuckles you can get manipulating the glove after the cement begins to harden. If you look at the way they’re positioned in the bucket you will see the folds. Nails could be done the same way. I’m not sure how good I could make them look but some of you creative type could surely come up with something! Really want to give this a shot though! It would be cool in the garden!
How do you make nails and skin creases
diy fun ideas has this project and shows that you slit the pinky side and squish some cement out then push them together and bend the hands in the way you want them to dry, using objects such as rocks to hold them in place till dry
Ok people, the gloves won’t miraculously produce wrinkles and fingernails. PRETTY SURE the first 2 pics are examples of artists pieces. The third pic was done with gloves. SMH, jeez!!
It says 2 days b4 removing gloves. I’m sure the hands can be joined by the cement b4 sealer is applied. Use the tweezers or sharp point to cut out the nail beds
For the 10th time…sigh..once you take the gloves Off, just use a sharp object (like tweezers ) and cut them out b4 you apply the hardener! Not Difficult at All!
i TOO WOULD LIKE TO KNOW HOW TO GET THE NAILS SHAPED, i AM THINKING THEY USED A DREMEL TOOL TO SHAPE NAILS AFTER CEMENT HARDENED & GLOVES REMOVED. tHIS IS MY THOUGHT
looks like they cast and poured for their own hands to get the nails and prints and the 2 picture looks like it was done with porcelain instead of cement.
Use quick setting ! It takes 20 minute
Kids and the young at heart scratch their names into partially set cement. There will be a sweet spot in time one can do this. I am going to do a practice one this weekend. I would post a photo here, but I don’t think thats avalible.
I think the one with the catus in it may have used some other type of form-its quite different.
You sure got a good response to your plant pot design. I think they are cute, and quite unique. I’d love to try and make a couple sometime.
You really should put actual pictures of what the project REALLY looks like. Take the pix down of the ones that were made other ways… NOT NICE!
If you want cement replicas of your actual hands with all of the details… Try looking on YouTube for a tutorial on how to make silicone casting molds… Then follow those instructions to create a mold of your hands and use that to fill with cement or some type of plaster, instead of rubber gloves. I think a using a mold mad of silicone would be more ideal because the soft and maneuverable material might make it easier to remove your finished product with more likeliness of not ruining the mold and allowing you to be able to reuse it.
Me ha encantado su idea, gracias por compartirla
Maybe we could use fake fingernails like the glue on type. Don’t know if this would work but maybe if we press them down on the outside of gloves when it was partially set it might work.
This is just an example or vision if you will on how to get the same look/effect of the hands that are made of clay, Use your imagination, that is really what it is all about, getting your creative on 🙂 Great idea and article, it’s making the wheels in my brain spin!!!
Love this, what a great idea for mothers/fathers day.
You can use Dental Alginate to make a mold of someone’s hands in these shapes. After the alginate sets, wiggle the hands out being careful not to tear the Alginate. Then pour plaster or concrete (I haven’t tried concrete) into mold. After the plaster has had time to set you simply peel away the alginate and you will have all the details of the hands right down to the impression of any rings that are worn. You may use a little sandpaper or emery board to finish up the rough edges but it won’t take a lot of work. You can then paint and seal.
I am thinking you would have to wear the gloves (surgical gloves-you may get the nails and wrinkles) and plunge your hands into something likeplaster…once that drys pour cores into the plaster mold…don’t know if plaster and cement are easy to separate – you tube how to make a prosthetic mold…
I meant cement
I have made hand and feet imprints before – exact replicas- but for babies that have passed away. They are mementos for the parents. Place the hand in a product called alginate(it’s a powder that is mixed with water) and has a “milk shake “consistency. The alginate sets up to a firm rubbery consistency. Gently remove the hand. Then pour a plaster of Paris and water mixture ( consistency on pancake batter) into the opening where the hand was. Rotate or vibrate to get pockets of aid to come out. Let set till hard. Gently peal away the alginate and the hand will be there….exactly as it was in real life….fingernails wrinkles and all. These products are what the dentist uses to make a mold of the teeth for retainers. For the garden project, one just has to find enough of or something equivalent to the 2 products….alginate and plaster
Just an idea …so many comments about the nails beING visible like in the first picture ..try gluing fake nails inside the glove …should leave the details like a real hand…I’m going to try this over the weekend and see how it turns out.
Go to Harbor freight for the tool. They have an offbrand it works great for under $10
The first thing I thought of for the nails and knuckles is a Sharpie. Start out with a pencil and then go to a fine line and do some shading. It would be permanent (sort of) and all you really want is the impression of nails and knuckles – the eye will fill in the rest.
After filling the gloves with cement and letting the hands harden slightly. PRESS FAKE NAILS INTO THE GLOVE, GLUE THEM IN PLACE WHILE HAND DRIES. THIS IS PROBABLY WHEN YOU FORM KNUCKLES AND LINES IN THE GLOVED HANDS. I think this might work.
After letting gloved cement harden slightly, press fake nails into the outside of the glove! Glue in place.while the cement is still formable gently make knuckles and creases the folds of the gloves hands.
the end product very cool…. but I do not get any of it and I am fairly crafty artsy fartsy…..how do you get the details nail. knuckles….on a latex glove…I am not sure this is not a joke on all of us
The 1st picture – if those are regular size bricks in front of the planter – that planter is huge – not made with gloves. Most likely bought at a garden center of some type. The 2nd picture is a planter – probably porcelain – it’s very thin, delicate and smooth. Concrete would be much thicker. The last picture if you examine it, is made with the gloves and cement. There’s no detail and it’s on a tree stump. Those are not large plants either….fitting into the palms. Can’t tell from the photo if they’re connected or not. Possibly just staged to look that way.
I think to make the finger nails and so. Well thinking. I would take the see thru gloves those ones the use to pack bread with. Then fill it up good lay it down plat use a small tool to press down and make the nails and all detail cause of the see thru it would be easy to see what ya doing. Then fold it gentley in the pot . Well that’s what I’m thinking would work.
How do you get the definition for the knuckles and fingernails?
You could turn the gloves inside out and glue cheap fake nails inside thend turn it the right way again and proceed with the cement process. It could be tricky but I am going to try it 🙂
Yeah! I had the same idea!
The ones that were done with the rubber gloves look very much like the hands of a corpse, not the lovely other versions that were done by artists (and yes, I have seen corpse hands, I’ve dissected cadavers). Your best bet would be to make a mold of your hands using plaster, then make a resin or silicone mold (cement would likely destroy the plaster) and then make a cement version. It would still likely need some refining to make it look nice, but at least it wouldn’t look like some scary Halloween prop.
Do you think if you sprayed cooking oil, like Pam, inside the gloves before adding the concrete it might make the gloves easier to get off?
I can’t seem to view the instructions for these “garden hands”. I found the list of needed supplies, but no instructions. Only pictures of the completed project. Help!!
As far as I know, concrete as stones in it and cannot be used here. Casting cement is what is required. Would it be used straight from the bag or would you have to mix it with sand? If so what ratio?
Only one other person had it right. Alginate is the only thing that will work to get all the details that are shown. I got in to post it, too. This is a business i do, sans cement. This is a project I’m doing this summer.
I make hypertufa planters which are made with a mixture of cement and peat/perlite.I ve made the hands before.when you position the gloves in the pot you will have creases where they are bent.After unmolding. The cement is still not fully hardened which would alow you to sculpt in details.Hope this helps.
Harbor Freight sells a cheaper version(Chicago) for around $9.00-10.00.
Well….. You can get the fingernails and anatomy of the hands by buying alginate (what they use to mold your teeth in dentistry). Follow instructions on how to mix and amount for hands would vary … Then you will get a negative mold of your hands pour the concrete in and ta da when cured you simply remove the hands from alginate . alginate can be bought outside of dentistry. :).
I just looked up alginate on Amazon 3 lbs for $23. Use COLD water to mix or it WILL set up to fast. Mix it smooth as you can as fast as you can (against a flexible bowl ). Pour into a container big enough for your hand(s) put your hands into container in desired position and wait about 2-3 minutes then carefully take em out and NOT disturbing the mold. The gloves are pretty much useless unless you just want to make hand shaped (no anatomy) pieces. Hope that helps
Does anyone read the comments! Geez get a grip people!!!
Use pottery clay, sculpt the nails, wrinkles ect. After dried paint with clear glaze. I do pit fires for raku, but finding people who throw pottery, or classes will get you firing time in a kiln. Our local art museum has classes. There will be a small charge for kiln time if you’re not in a class. Intriguing idea but like the one person said why bother if we can’t reproduce it, especially the large hands. Feel cheated.
Is there a book I could buy ?
Could you glue the fake fingernails, you can buy almost anywhere, to the tips of the gloves before pouring the cement. and just make small wrinkel
s in the gloves when you lay them down.
Go to Home Depot or hardware store. Just saw big “paint/concrete” gloves at Home Depot today.
Can u glue fake nails on the glove and slowly pour the mix into the glove for the imprint
I went through all of the comments to pull out the ones that would be most helpful to recreate the nails and knuckles. It’s a pity it took sooooo long to identify the helpful comments from among the dozens and dozens of comments asking how to recreate life-like hands. Really, if you are among the many who asked about the nails and knuckles without reading the very same question posted early on, you should be embarrassed.
Maybe for nails by some artificial ones from a beauty supply or Walmart and press them down on the outside of the glove for an imprint
posso usare l’italiano or english