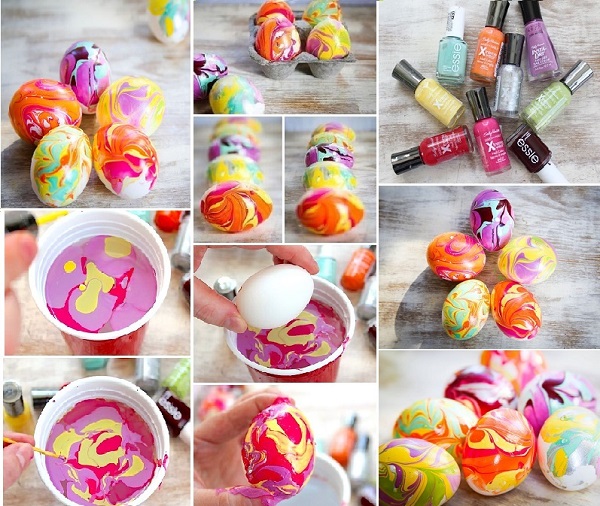
This Easter, use your creativity and decorate the Easter eggs using nail polish. It will make them look special and nonconformist and all of your guests will be surprised by how good your Easter eggs will look. You will create a marble effect on the eggs by using a few things you already have at home. To make the decoration you will need:
• eggs (boiled or empty);
• nail polish (different shades);
• toothpicks;
• plastic containers;
• a ribbon;
• rubber gloves;
First boil the eggs or empty them, by making two holes in the egg and blow the interior of it out with a straw. Place water in the plastic container. Bring the water to room temperature otherwise the nail polish won’t fix on the eggs. Pour nail polish in the water and take the toothpick to make swirls in the mixture. Put on the gloves and take one egg in your hand. Place the eggs in the container and leave it there for 1-2 seconds. After the eggs are dry, you can tie a ribbon to them and place them in a nice basket filled with freshly cut grass. You can also make an Easter tree by hanging the eggs on it.
source: henryhappened.com


Worst idea ever……..nail polish eats through bottom of plastic cup leaving the biggest mess ever to clean up! !!!!!!
Aside from that how did the eggs look? 😛
These are by far the prettiest Easter eggs I’ve ever seen. I never thought to use nail polish to dye them. I will be trying this over the holiday weekend.
Polish clogs immediately and it did not work as described…..tooo bad…was a great idea but the result was awful
I fell in love with this idea but the practical part was horrible. It made of course a very big mess but what more the colors also mixed together badly so now it seems like one big naughty scribble :// do not know where I went wrong…
I did this just last night, using glass containers. Must of my eggs came out nicely. But, sometimes I did use yoo much polish and it made a big mess.
Use warmer water and gel type nail polish. I used boyh types ( both liquid and gel together) and one came out looking like the earth from a distance on one side. I loved it. I didn’t use gloves, though. Should’ve. And I also should’ve asked for help instead of doing it by myself. But, end result came out fine for the most parts. I had fun for 6 hours. (Had to keep stopping to clear my head even with every window open.)