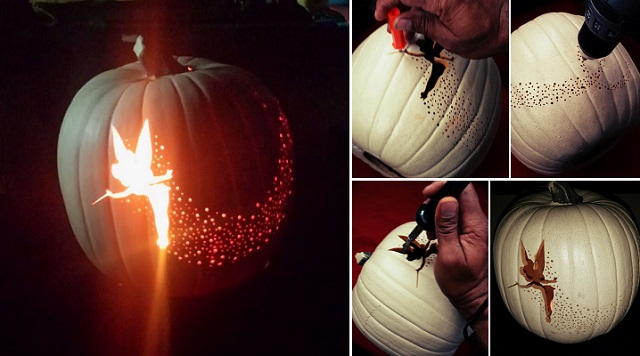
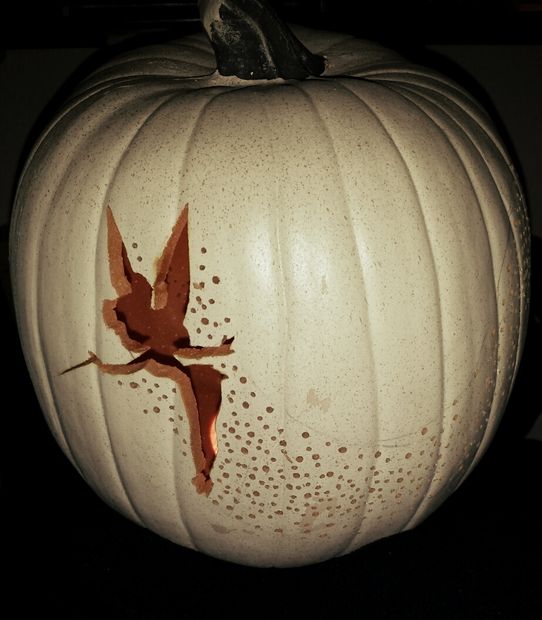
This next Halloween idea is so beautiful and your kids will simply love it. You can make a large pumpkin that has the shape of Tinker Bell carved in it and it will surely remind everyone of childhood and pleasant times. You can make your porch look as if it were a part of a fairytale, by creating the shape of Tinker Bell on a pumpkin and placing a candle inside.
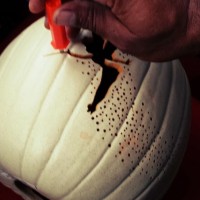
The candle will beautifully light the whole pumpkin and let Tinker Bell glow in the dark. You can create some small holes too so your pumpkin will look really magical once the candle is lit and will sparkle all around. Involve your kids too in the process of creating this beautiful ornament as it will be a fun activity and they can develop their creative abilities. You will need a large pumpkin, a stencil with Tinker Bell, a hot knife and a drill. For detailed instructions, take a look at the link below and make this year’s an unforgettable one.


What is a “hot knife?” Will a wood burner tool work?
A hot knife kinda resembles a soldering iron with a blade tip on the end. They are usually used for sculpting plastics and foams.
hot knife is the little saw knives that are in the pumpkin carving kits
Nope, No it is not.
Some wood burning kits are multi tools and have many tips to add to the tool like glass etching, leather burning, hot knife tip, various cutting, burning and etching tools.
I can’t find the link with the instructions for this project. When I click on the the arrow or the picture it just give a larger view of the picture. Where is the link?
Instructions are at the end of the articles. Thx.
The tinkerbell template is the last page/end of the article…no directions 🙁
Tinker Bell Pixie Instructions by Luis Linares (click)
“Tinker Bell Pixie Instructions by Luis Linares” No such “link” exists on this page. Only the arrow pointing to the right and it takes you to a page with a small and larger stencil of Tinkerbell. Please check your information or provide a better description of where to find detailed instructions. Thank you.
The instructions are under the template. The words in blue are a hyperlink. You have to look for it because the words are small, but they are in fact there.
instructables.com/id/Tinker-Bell-Pixie-Dust-Pumpkin-Carving/
is there a link for the directions no details available at the end
Here you go people … I did a little research via Google and I found this site (it also has actual comments from Luis Linares (especially that this is an artificial pumpkin and not a real one): instructables.com/id/Tinker-Bell-Pixie-Dust-Pumpkin-Carving/
Hmmm….I don’t see directions either!!!!!!
Scratch that. It’s in the worlds tiniest print below the pic on the second page. No wonder nobody can see it.
Scratch that. It’s in the worlds tiniest print below the pic on the second page. No wonder nobody can see it. I had to change my name and email just to post again…it kept denying me and saying its a duplicate post …you already said that. Nice site.
I’ve been trying to pin this, but it keeps getting blocks for inappropriate content??? Just thought you’d want to know.
Under the tinker bell template is a hyperlink in blue
these instructions, using the hot knife, it for a ‘funkin’ an artificial pumpkin. probably possible with a real pumpkin too, though keeping the goo from closing the holes can be a pain, i had that problem with one i carved with larger holes using a drill bit
if you use a spiral drill but, prepare for curls of pumpkin going everywhere, it’s fun though!
you could put a pattern on for us to print out