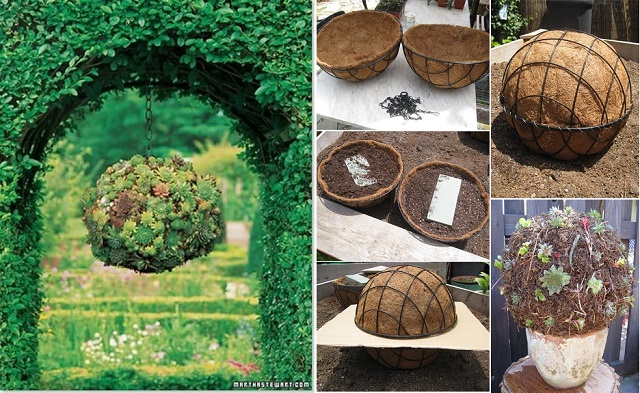
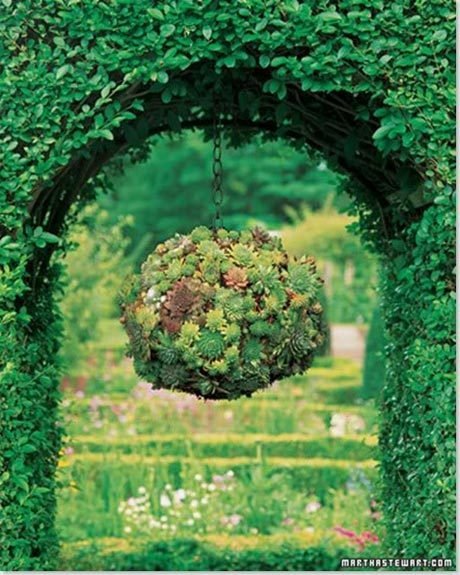
Remember the movies where the gardens the main actors took walks into look almost from the fairytales? The same goes with lifestyle magazines, where you see all kind of celebrities posing in majestic gardens. Luckily, you can make a garden design just as beautiful by following some simple tips and implementing a few easy DIY projects. Today we have this succulent kissing ball for you to assemble almost from scratch. Avoid spending a nice amount of money on this sort of piece in the store and make one by yourself. It’s much easier than it looks! You start with a couple of metal hanging baskets (make sure they’re identical though), some cactus soil and florist foam blocks. Continue your build with succulent plants, a metal chain and a bunch of other materials. Find out how to use them in a way which will result into a beautiful hanging succulent ball. One thing is sure: it will make your garden look beautiful! Just like in the movies.
Materials:
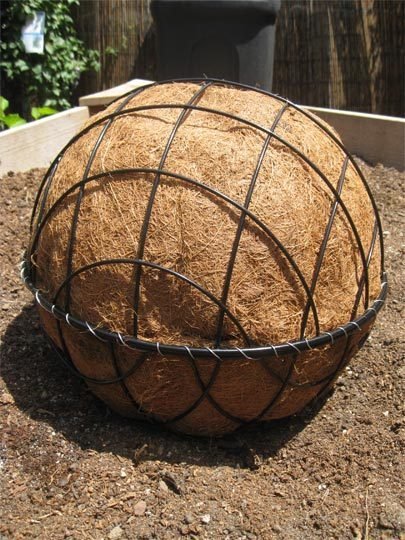
2 Identical metal hanging baskets
Cactus soil
Florist foam blocks
Spagnum moss
Succulent plants
Floral pins or paper clips
Metal chain
Fishing line
Heavy wire
Cardboard
Screwdriver or pencil


This article is so interesting, first of all, to make those metal baskets you’ld have to be a proffessional, no way a normal handyman makes this, It has been welded, powdercoated,…please! ‘Get a similar basket from a shop’ would’ve done better.
Second: there’s no way people get this, there’s no explanation, only undetailed pictures. There’s moss hanging around the ball suddenly, magically it sticks to the bottom…
I’m sure it satisfies people to be ‘inspired’ but they’ll buy this later somewhere…
Your an idiot. The baskets can be bought for a buck at the DOLLAR store. The moss was attached with the fishing string dumb ass. Anyone could figure that out by looking at simple pictures. Great post thoe but not for stupid people
Well, Nick, you certainly picked an appropriate name to use, as your needlessly insulting reply certainly makes you sound like one! It wouldn’t have killed the poster to add a one or two line description to each picture to make it easier for people to understand. Not everyone can just look at something and understand how it was done. Assuming everyone can, limits your audience! Perhaps if I took a bunch of pictures and gave you a list of components you’d be able to figure out how to assemble a computer? Also, maybe you can find some baskets like this at the Dollar store, but I’d suspect they wouldn’t hold up much longer than the time it took you to assemble this! Good ones can be had from home improvement stores more in the $5 range.
It was pretty obvious what was going on in the pics if you just actually looked at them. He may not have that nice about it but he was certainly right about what he was saying.
You are what you say you are, plus a Wanker. Keep off the post.
You are GROSS
First, those are commercially produced wire hanging baskets that come with the coco mat liners.They are available at nurseries and home improvement garden centers. The florist foam is just a filler and is available from any hobby store that sells silk flower arranging supplies. The moss comes in loose form or in pressed sheets also both available at hobby or garden stores. It is pinned to the cocoa mat and helps keep the roots moist. the moss picture shows the start up of the succulents. the finished picture shows the placement of all the succulents. The more gardeny among us might start with fewer succulents and plant out the small offshoots and wait for it to grow in but you don’t have to.
Not too difficult a project.
Seriously? U managed to turn an article about succulent baskets into a argument. Well done.
I was just going to say, “Really, Kobe?!” Don’t dis the nice article someone thoughtfully prepared. There is enough info for the mildly green thumbed individual to figure it out and put together a nice project. Quit trolling.
interesting reading people NOT…but back to article, i have made these and you need a very strong wire chain hanger as the succulent balls are very heavy, they do cave in a bit as soil settles but once the plants grow it fills up with roots…enjoy
Explanations would have been nice..
It’s kind’a obvious, still. Some people could use some more explanation.
For example, just how do you attach the wetted sphagnum moss. And, shouldn’t you soak the wired shut sphere in water and let it drain before you plant the roots (into the dry cactus mix?).
Just why the floral foam? (It holds water, cactus soil not so much.)
A lot of people need more hand-holding.
And aftercare… Me? I’d suggest soaking in a tub of water for an hour or so and then hang to drain. How often? It depends. Maybe a 1/4 strength fertilizer once ever 4th time during growing season? (Less watering and no fertilizer during dormancy.)
I killed many plants because I didn’t know better until I learned/was told. The crafting part is newer to me.
No need to.become rude about it Mr Big Dick….
Pretty easy to understand except that white cardboard thing, what and why is it
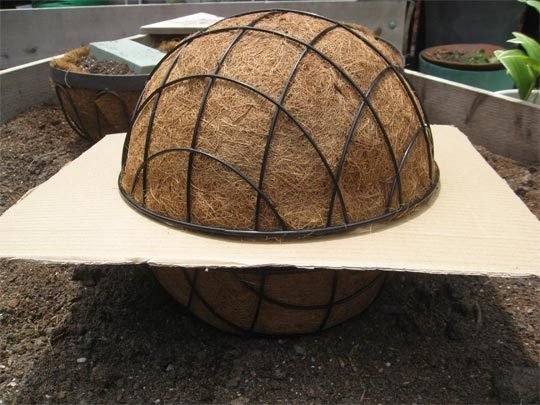
The cardboard was used to to keep the soil from falling out from the basket that was covered while you turned unto the other wire basket. Then the cardboard was slide out from between the baskets. Then wire was used to hold the baskets together by wrapping it around the edges of the baskets.
Hi Lucy. It’s a while since you asked, but I thought the cardboard is to help you get both baskets together. You’d need to cover the top of the one you are inverting, so the soil doesn’t fall out, before turning it upside-down. Then once you have it placed over the bottom basket, just slide the cardboard out.
Let’s say you’ve filled the two halves with sphagnum. To put the two halves together without the upper one spilling, you cap the open side of it with a sheet of cardboard, hold that in place while you flip it over, and lay the whole business on top of the other half. Then, carefully, you slide out the cardboard.and wire the halves together.
Just wondering if the spagnum moss layer on the outside is really necessary? The cover page has a photo that shows a ball with the succulents planted directly into the matt lining of the metal basket cage. This looks like it might be a neater easier way of doing it to me, so I’m just wondering if the spagnum moss adds anything really essential for the survival of the succulents?
Yes agree with Lucy re the cardboard? Not sure about that part an explanation would be great thanks. Can follow most of it, although as has been mentioned a few times, some instructions under the photos would have been a bit more helpful. It needs to be exactly right, not a guesstimate.
What a wonderful idea. I can definitely see myself doing this project. Thank you for the inspiration and all the lovely photos
Hysterical comments. Sure did get away from the topic..I’ll try it..think I can do it..ha ha ha
The cardboard is placed on top of the soil in the upper basket so that when you flip the basket the soil doesn’t fall out. Once the top is in position then you slide the cardboard out or you can cut it to size and leave it there. It will eventually break down and become part of the soil.
you so much
Fawn
I have just made one of these using plastic to line the baskets, then fibre and then filled with potting mix. The tricky bit is joining the two halves together (used a flat level board and removed it quickly with the help of husband. Join with cable ties. The plastic keeps the birds from making nests with the fibre. It is hard to push holes in to “plant” the succulent, and yes the soil sinks but I also make room fat the top for a small pot (2″ H x 1″W for watering so I removed the pot added some more soil and then put the pot back. Larger pieces needed to be temporarily pinned. So now I wait.
Just guessing, but the foam blocks are prob needed to reduce the amount of dirt to make it lighter and/or to obsorb water. Also don’t need to wire the moss mats to baskets the dirt olds it against inside of basket and slide the cardboard out once you have joined two halls together.
For real you can get all these supplies with no trouble. My 7yr old grandson would have a blast doing this. Going to get stuff this week so we can fix one next weekend.