
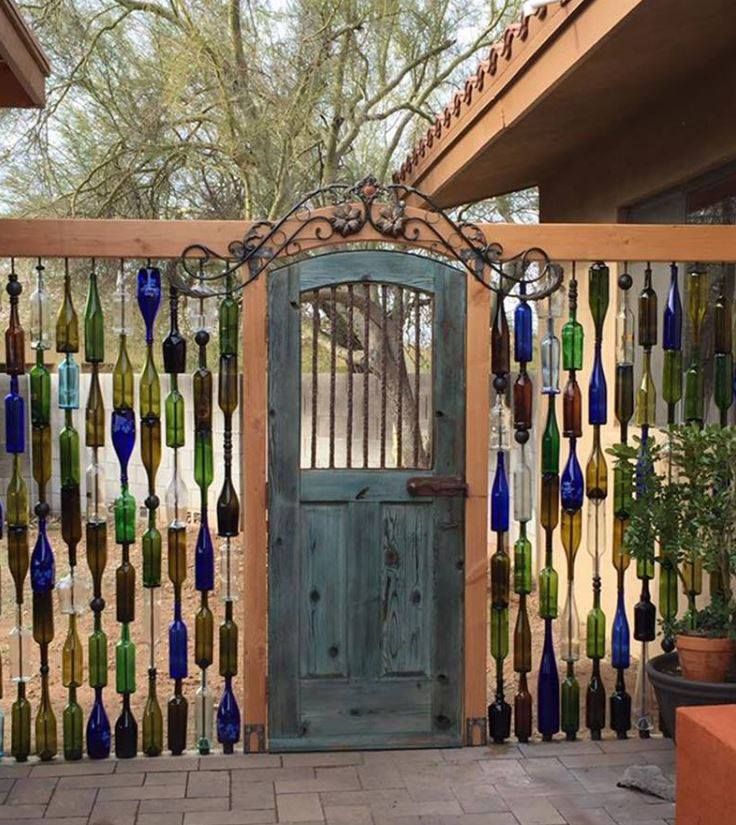
Why not try something special in this summer? Make a creative and unique bottle fence .. drill a hole in the bottom of each bottle, then run rebar through the bottles. Can you imagine how stunning it would be when the sun goes through it? At least it is a inspiration model … if you decide to build one .. select different colors of bottles to bring a special glow. This idea fits perfect in a summer terrace … How does it look?


So how do you drill a hole in the bottom of a glass bottle?
With a diamond drill bit.
and you turn the bottle upside down and make sure you have it stable!
Find a suitable means of keeping the bottle steady and upside down then build a clay dam around the area you want to drill and fill this little pool with water…if you don’t keep this little dammed area full of water…your bottle will crack or shatter from the heat generated by the diamond bit spinning at high speed…takes a little time but is worth the effort…just need to find a diamond drill bit large enough to accommodate the rebar! These speciality drill bits can be pricy. We got one at Harbor Freight and it was about $20…but so long as you always use water…and PLENTY of it…our bit has lasted a very long time…drilled many holes in lots of glass!
Thanks!!
of course.. works
I use silly putty, it holds water and is reusable….
My dad was a glazier and he just kept adding a squirt of oil to the drill bit where it meets the glass and drilled slowly.
Thanks!
thanks for the info , I am thinking at our next place I might just try one of these.
yes silly old woman is 100% correct… and may i add you should never drill or sand glass without water because the dust partials are very harmful to your lungs, tiny dust partials of glass….as long as WATER is used it is safe to drill and sand glass be careful when cleaning up and make sure it stays wet
We bought some diamond hole saws on Amazon for a lot cheaper than we would have paid at Home Depot or Lowes. Do your research first.
I would use a circular plug cutter ceramic diamond drill can be found a Lowe’s, Home Depot.
Why not click on “Video Tutorial” and find out.
There’s a video link with all the necessary information–lower left-hand side below paragraph under picture. Is it perhaps not visible to everyone? Maybe I can copy it here: http://goodshomedesign.com/how-to-build-a-bottle-wall/
Do you need to anchor the rebar to the ground and roof?
where the heck are the instructions as posted “How to Make a Special Bottle Fence”????
Now that would be telling ya…….I just love all these ‘easy’ things to make,it is a bit like the unreadable instructions that are given with certain flatpacks- totally incomprehensible ,faded diagrams and English that really is double Dutch.
But seriously folks,I do have an idea how this bottle fence has been made and will gladly pass on the information,just let me know.
🙂
I have started a collection of bottles…wanted to make a bottle tree…but I love this “fence”…Directions, please?
Please pass on to us. Thank you
asking for directions on making bottle fence
looks kool
Help??? Need ideas on how to attach the individual bottle filled rebar to something to hold it upright and stable???
Thanks for any help…I really want one of these and already have many bottles ready to drill…
Regards!
I would use a little dab of silicone between each bottle, so they wouldn’t touch and possibly break…..
Just a thought, but I think instead of rebar I’d use threaded metal rod. With that one could use washer and nuts to put between the bottles and leave enough of the threaded rod at top and bottom then one could insert the rod then tighten with nuts. Also another variation on this would be to use threaded pipe like one finds in lamps. One could then make a lamp with the colored bottles. Same as one would do with the fence but requiring a lot fewer bottles.
Another advantage to using threaded metal rod is I believe one could find a smaller diameter rod than rebar. Smaller diameter rod=smaller diameter diamond drill.
I wonder if you could simply use wooden dowels to do this? What do you think?
i really think this could work?
have you tried this ?
Threaded metal rod sounds like a good idea but it would probably rust. You could paint it but it would still be a bit unsightly, I think. I would probably hide the bar by cutting PVC pipe or short pieces of bamboo in between bottles.
I think I’d also get some rubber washers for between the bottles… the wind could break them if they rubbed hard enough
I would like to know how to attache the rebar top and bottom! Would appreciate any ideas!
Thanks!
If you are setting this in an area of your patio I would suggest simply framing it with wood (like two by fours treated for outside use). If the patio has pillars holding up the roof you could make it to fit inside this area. Measure your area, cut the frame to fit, lay it out on the grass of your back yard and tap nails in to temporarily hold frame together as you will need to take it apart for the final assembly. Create all of your bottles-on-rods however you desire and lay them out inside the frame, spacing them as desired. When you have everything arranged the way you want it, mark the locations top and bottom of where you want to insert your rods and then take the frame apart and drill holes top and bottom, insert your rods and re-assemble the frame. Lift it into place and nail frame and into the area you picked for it.
That’s the general idea; you may have to modify it for your particular environment.
Don’t forget to make sure your rods are long enough to go from the inside of the bottom of the frame to inside of the top of the frame! Generally, it is also a good idea to clear caulk the holes in the wood at the bottom after final assembly and installation to keep water out as rain will enter the holes and eventually split and/or rot the wood.
Hi Jim,
Could you send me your directions on the bottle fence?
Thanks,
Christa
I would love to have the instructions on building the bottle wall. It is so pretty.
Click on “video tutorial” just under the picture.
Please send directions. Thank you.
Would like instructions please and thank you!
Would like directions too
We would love it if you did!
I bet if there’s any space at all between the bottles, the wind makes all kinds of weird noises as it blows across the mouths of the bottles! It sure whistles in my window air-conditioners.
I would use a little dab of silicone between each bottle, so they wouldn’t touch and possibly break…..
so….could you drill the holes side-to-side and have the bottles stack horizontally? That would really make the wind-blow-sounds fantastic.
I had just thought of that a few seconds before reading your post.
I am a scientific glassblower and drilling those holes is not an easy task, very easy to break the glass if you go too fast, the use of water is necessary!
GOT TO MAKE ME ONE OF THESE. FINDING ENOUGH BOTTLES WILL BE THE PROBLEM AS I DON’T DRINK. YARD SALES AND ALONG THE SIDES OF THE ROADS???
What about covering the bottles with some kind of clear paint or plastic wrap? Or maybe you could glue clear colored beads, inside or outside, clear bottles in a net design or on strings. There are kits to make suncatchers that you cook in the oven to set. Could you put these on the bottles before baking? Anyone expand on these ideas? We also have a large recycle system in our town. Maybe we could get bottles there, or at the drop off sites.
Another idea. Your local bars have tons of wine, beer and water bottles. Maybe you could make a deal! Try your fancy health food stores or book stores that sell bottled “whatever” I used to get the beer bottles that had the wired cap to use as storage bottles for vinager and oils.
Contact some local bars. I’m sure they’ll be happy to give you some bottles!
My friend needed a TON of bottle caps for a class project (she is a teacher, and she spray painted all the caps so they they wouldn’t have beer logos on them) and she called a bar and they just made a box for her and threw them in there instead of in the trash.
I had friends and friends of friends save them for me. I also contacted local wine shops with wine tastings to save their used ones. Got over 300 in less than a year.
I was getting some of mine from our recyclable dump. WE used the diamond tip on the drill, I just wanted to know what they are using to connect the rebar on top and bottom.
Check out liquor stores that do wine tastings, call restaurants that serve wine or have a bar. just suggestions. ;- )
go to a recycle center most of the time you get the bottles for free ..all kinds of colors
go to any recycle center….go to bars or restaurants that sell wine etc..they may have quite a few…
you can scrounge around in the glass bins at the dump, just be discreet about it.
ask a local restaurant to save over a weekend, promising to pick up promptly on Monday morning….Olive Garden Italian in my area did this for me on another project…will get mostly ambers and clear so you may have to ask others to save the other colors for you
I found some for 25 cents at the thrift store
I would think that restaurants and bars would be happy to part with their wine bottles! Or, if you just put the word out there, friends and family would probably come up with all the wine bottles you’d need in no time! Good luck!
Or you could string corks between the bottles or alternate a row of a string of corks and or beads between the rows of bottles. Ive also seen a room divider made with strung corks and beads and glass figures. It was really eye catching!
The special bottle project…how do you secure it on top?
Just take a 2×4 and if you are using 1/2 in rebar, drill 1/2″ holes, in to it, on 6″ centers for the top. Insert each into the wood top…..I am planning on making the bottom the same way
I have seen one of these made mostly with purple bottles outside a purple house. Pretty cool.
I clicked the link thinking I was going to get instructions on “How To” do it. Instead we’re served up a fluffy paragraph saying pretty much what the post on FB said. It’s a fail in my book when the readers have to supply the knowledge on behalf of the page. Great idea. Poor info.
I haven’t made a fence like this, but I have drilled into a bottle before. I found the best way for me was to use a small bucket of sand. fill the bucket almost to the top, take the bottle and push it into the sand far enough to hold the bottle steady. it only takes a small trickle of water at the drill site to keep your bit cool and to keep tiny bits of glass from flying about. keep the drill rotation fairly slow and be patient!
I am a Scientific Glassblower. I have also worked construction in my life for a number of years.
The drilling of holes in glass can be done with diamond hole drills and rebar is measured in size I believe they start at #2 and go up from there. A #2 rebar is called 1/4 inch, a #3 would be 3/8 inch, and #4 would be 1/2 inch, and for every increase in number the size is larger by 1/8 inch. For a bottle support I would suggest #4 or 1/2 inch and I would say you would want 6 foot of rebar. The concern I have is that will the #4 rebar fit inside the top opening of the bottle? (I do not drink, so I do not know.) If it does, you need to make sure that the drill you purchase will be large enough to have clearance for the nobs on the outside of the rebar. For a #4 the drill will need to be 5/8 diameter diamond.
Then to support the rebar top and bottom, I would use 4×4 pressure treated. I would drill with hole saw the 5/8 inch hole about 1 1/2 inches deep and dig out the plug. The spacing of the holes sill set how many rod and the bottle diameters will set how close the holes. Then you will put the bottles on each rod, when you have all the rods ready with bottles, lay 4×4 on ground with holes parallel to the ground. Insert rebar into holes then the top board start at one end and insert each rebar into top holes as you go down the board. (You might want to use a rope or ratchet strap to hold the one end of the boards together as you insert the rebar into each hole on the top board.) One you have the rebar inserted in the 4×4’s top and bottom you will need to finish a frame to hold it all together. Then you would stand it up as a wall and install it where you want it.
As to the diamond cutting of the holes. The bottle will have to be securely held in place. If you are not good with tools, have someone who is good with tools do this operation for you! You do not want to break the glass and cut yourself! I would suggest this be done in a drill press and I would suggest for the 5/8″ diamond hole drill that the RPM (revolutions per minute) be no more then 600 rpm. The pressure to drill will start light until you have a well defined grove for the drill, then you can increase the pressure to about 3 ft. lbs. on the drill press arm until you get close to the inside edge of the bottle and then back off the pressure to light as possible just like when you started the drilling process. It is best to have a water supply through the center of the diamond drill, if you can not do that, then use the method mentioned of taking molding clay and make a dam for the water to sit in and drill under the water.
If you pay someone to drill those holes, it would not surprise me if they were to charge $5.00 per hole.
Have fun.
There is a link to a YouTube video.
I have a bottle tree and got some interesting colored bottles from TJ Maxx. It was hard to find unusual colored bottles for a low price otherwise. Got a few on ebay, but they’re expensive.
Think this would have to.come down in the winter or would enough silicone, properly applied be enough protection from freezing and subsequent breaking???
You can buy @Amazon, empty wine bottles
Indeed, these fences are very beautiful. A very nice and creative idea for enhancing the beauty of the outdoors of your house. Thanks for sharing the picture. I will definitely try it out. Please give us some tips on how to stick one bottle to another. Thanks in advance for any tips.
Do you need directions on building a Bottle Wall ? Simply go to YouTube and type ” How to build a Glass Bottle Wall. You can find many Videos with step by step instructions. You’re welcome.
Hi
I would love to make this bottle fence and I love to see what type of drill bit you use to drill the bottle can you send me the pictures please please .
my self I do work with wire and beads so I need to mix with bottles
thank you
Douglas
How do you mend it? One crack, one stone…not good
Excellent answer, thank you
After reading about 30 of these comments, I decided that life is much too short to make this bottle fence; it’s even too short to read all of the comments!
Good question. I wondered that myself
Wondering how these bottles would hold up in -30 degree weather?
Shoot, we have 13000 bottles! All are clear ale bottles, same shape. We are painting them, making sculptures, and selling.
Go to your local hardware store. I prefer Home Depot. Go back to flooring in the tile section find the tools area and buy a diamond hole saw at the appropriate size. Use a bucket of sand or cat litter to hold the bottle in place. And drill will work but I use my drill press. Use a low speed setting and go at the with a gentle touch. If your using a hand drill starting the cut at an angle to the cutting surface rather than flat to the surface you can basical cut a starter track then roll into a 90degree that you want for this procedure. Starting flat you’ll tend to jump the bit because you have to much cutting surface until the guide track is cut.make sure to have water or cutting oi lover the drill at all times. Pour some in the cone where you are cutting run a hose over it or use playdoe to male a dam to hold the water while using both hands. GO SLOWLY. YOU DONT WANT TO BREAK THE GLASS. Wash bottle imediatly or the glass dust will stick to the inside and look like he’ll
Good luck
Where do the glass balls come from that are put in between some of the bottles?