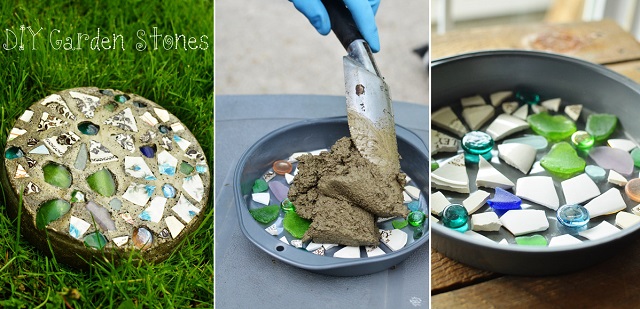
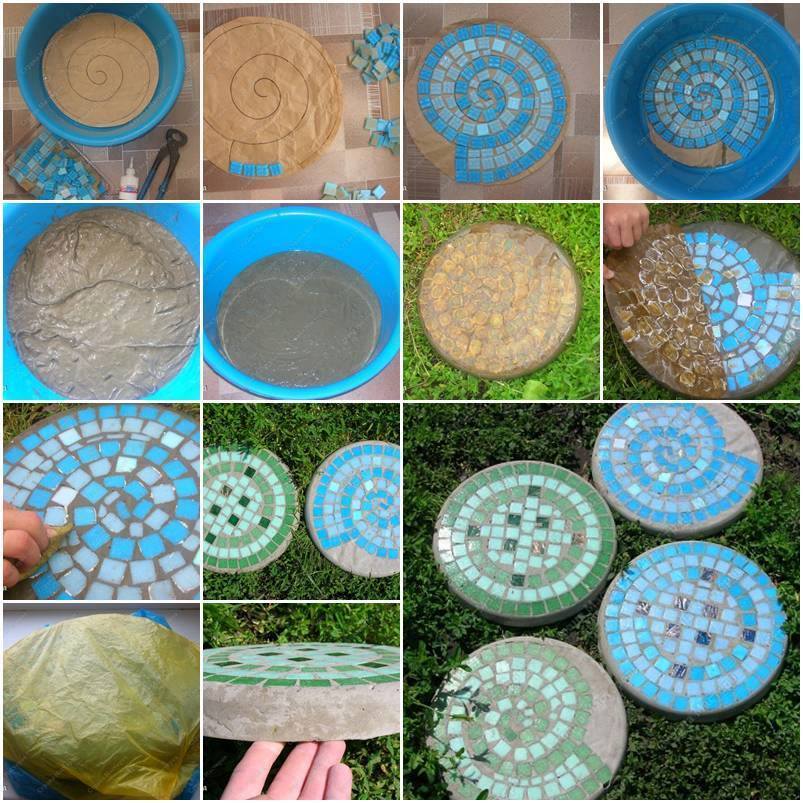
Trust me when I say that you don’t need any fancy or expensive mold to make garden stepping stones, all you need is a non-stick cake pan! And believe me you won’t even ruin the pan! Discover below a very easy way to make mosaic stepping stones.
You will need the following materials: round non-stick cake pan (use also a heart-shaped pan) / Vaseline / contact paper / old plates or that you don’t need / glass gems / concrete / marine varnish / mosaic glass cutter(optional) / chicken wire or other type of wire mesh / safety glasses / rubber gloves / dust mask / hammer / bucket / trowel / water.
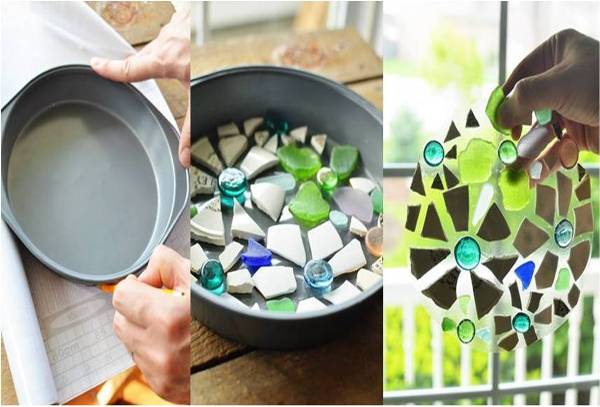
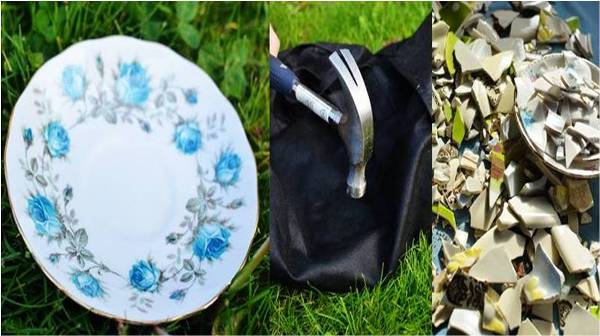
Make the garden stepping stone like this: Put your safety glasses on. Place a plate or saucer inside a cloth bag or cover with an old sheet or towel, and smash it with a hammer. Repeat until you have all the pieces you need. You’ll probably want a variety of sizes. Place your cake pan on your contact paper, and trace around it.
more details here… (How to Make Stepping Stones – with a Cake Pan by Intimate Weddings )
>>More ideas <<


What’s the next step? i would like to read the rest of the instructions.
put it on the lawn and walk as much as you want ;D
Looking at this, the rest would go something like:
– coat pan with vaseline.
– peel the contact and place sticky side up in pan.
– arrange pieces of glass/ceramic etc face down in pan; the sticky stuff would let you pull it out to see if you’re happy with the design (and protect the pan a little).
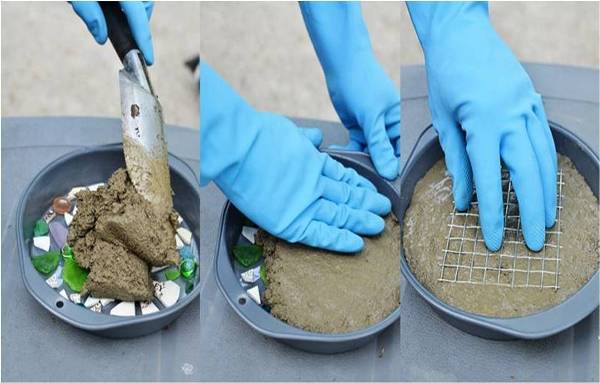
– mix the cement according to instructions (did you know you can get different colours).
– cut a piece of wire to size.
– fill half the tin with cement and compact around the glass/ceramic pieces well. Press in the cut wire and then fill tin with rest of cement.
– allow the cement to cure according to instructions.
– once cured, remove from pan, peel the contact off and give it a good was to remove any vaseline remaining, allow it to dry really well.
– once dry, apply the marine varnish according to instructions.
Thank you!!!
How can I make the “sticky stuff”? with what materials? Thank you!!
o_O The “sticky stuff” is the contact paper.. your design will stick to the sticky side of the contact paper. You don’t make “sticky stuff”. They’re just saying that in lieu of saying contact paper.
Just remember if you are using broken pieces of plates, etc. to position them pattern side down.
you can get repositionable adhesive spray at the craft store. you can spray that on paper. or perhaps you can just put a layer of vaseline, butter, dough on some paper? might work, depending on ur design.
thanks!!!
Thank you Nita. You must be an experienced crafter. I would not have been able to fill in the blanks.
you finished the directions very well. You’re an excellent teacher!
I like the contact paper idea that keeps your design in place when pouring cement in. I used book cover contact paper worked great.
You don’t put the contact paper in the pan until you’ve put the glass/ceramic pieces on it. That way you can adjust the design after you pick it up & look at the pattern from the side that will show.
Thank you !!!
There is a “click here” link that takes you to full directions under one of the pictures. Good luck!
below the pictures showing them putting the wire mesh in there is a line that says “more details here” the here is in blue click on it it will take you to the website
See the fourth set of pictures above, the ones featuring the blue gloves? Right underneath that, it says “more details here” and that is a link to the rest of the directions.
Under the 3rd row pictures, there is this message. Click the word HERE…
more details here… (How to Make Stepping Stones – with a Cake Pan by Intimate Weddings )
Me Too! Instructions stopped at tracing around cake pan.
FULL DIRECTIONS 🙂
http://goodshomedesign.com/cake-pan-stepping-stones/
Good grief…. Thought I was onto something there. Nevermind! #FAIL.
WHAT ABOUT THE CLEAR ONES, WHAT DO YOU USE, I WOULD RATHER HANG THEM UP!!!
You might try clear pony beads they melt and could provide you with the clear look you want.
Me Too!!!!!!
You left us hanging….lol
I would like to known how it’s done with that window hanger
That isn’t a window hanger, that’s the author showing the mosaic tiles set on the clear contact paper backing. The straight line behind it is the window muntin bar.
I think it be cool to just have it on the contact paper and hang in a window like that!
Lol….too late smart! Thanks. However,after seeing the rest of the instructions and finished product I definitely wouldn’t make it! It didn’t look nice at all!
I like the look of the glass against the window too. So — any ideas how to adapt this into a window mosaic – using glass instead of the plate. I wouldn’t trust the contact paper…
Basically a stained glass look without using stained glass techniques…
Anyone?
yeah, i think that’ called window clingers, right? dollar store. cut ur own shapes out of theirs.
This is a fantastic idea! Thanks for sharing
To all those interested you can find the complete instructions for this DIY project at the following link: http://www.intimateweddings.com/blog/how-to-make-stepping-stones-with-a-cake-pan/.
Por dios, porque un envase antiadherente para hornear, esto se hace con cemento ..solo hay que darle tiempo a que frague y seque!
Bonjour,
magnifique idée !
pouvez faire une traduction en français SVP ?
je vous remercie d’avance.
Elodie
though it is incomleted, thanx
What’s the transparent substance ? It’s beautiful !
Quick question: why do you need to place the square wire on it?
to keep it from breaking , its same as adding rebar to sidewalks and drive ways. it will also help making it last longer in colder areas in winter time
Why do u have to have the contact paper & put the plate pieces on the bottom…why can’t u just put the plate pieces on the top of the cement???
I think you would have a smoother top doing it this way instead of placing them on the top. The contact paper would keep the pieces from moving around too.
Realmente hermosos, fáciles de hacer e instalar en el jardín. Gracias
A clear epoxy could be used instead of cement. I am just not sure if it will release from the pan after hardening. Any ideas on how to keep epoxy from sticking to the pan?
For the window style projects you would use clear casting epoxy available in craft stores however you need to pour enough to cover the pieces so don’t use thick material and keep the patterns small. This stuff is used for making paper weights.
I have made many stepping stones using this similar method (I am making a stepping stone path, a long stepping stone path!!). I played around with many types of concrete to see what would give me the best stones, and found using mortar gave me the best stepping stones, and is still plenty strong when you use the mesh in the middle.
What is rhe wire for
The wire is used to strengthen the concrete/mortar when the stepping stone is used outside (helps to retain it’s strength during the Winter months)
Think like rebar in another from of concrerte. It makes it stronger.
Oiling the pan, either with vaseline ir pam should do the trick.
Using a 2 part acrylic resin would work. You can get resin at craft and hardware stores. Be sure to mix and let the resin cure outside, though, as the funes can be very dangerous. You can get a mosquito tent at a dollar store to cover the project anf protect it from bugs while it dries.
There’s a link that says “more details here…” Click that.
Click the blue HERE and the full directions are there. Simple
What is contact paper please? I am in the UK and have not heard of this.
In between the 2 photos it says more details here. Tap on the highlighted word HERE. It will take u to the next page.
I love these ideas. For the stepping stones I am going to use a concrete dye to color the concrete , love terracotta! For the clear ones I’m thinking that in addition to the ideas here, I might try making some to hang in my tree. I’ll ask at the craft store how art foam would work with the casting epoxy. Thinking of making some for the different holidays to hang in my tree inside or even outside. EXCITING! !
If you take a long piece of wire and bend it in half- then bend the ends outward kind of like a T shape… immerse it about 1 inch into the back of the tile … Once the concrete cures, you can bend the wire so you can display it like a plate without a plate on a plate stand.
Is that some chicken wire going in between the concrete layers for reinforcement? I will be making this only bigger stepping stones, I’ll make a template out of wood and do same thing, and use some parchment paper to put the pottery & Or glass pieces on.
Under the photo with the 3 pans wearing ble gloves. It says more details here. Click the here word and takes you to another page with more info
The complete instructions are right below the pics in Blue ! it says for complete instructions click HERE.
You could pour clear epoxy into a disposable aluminum foil pan. When the epoxy has set, you can peel/cut the foil pan off.
Thanks so much for the correct way to make stepping stones that will come out of the mold I cherish. I couldn’t free one from my Mickey Mouse pan. ?
Thanks so much for the correct way to make stepping stones that will come out of the mold I cherish. I couldn’t free one from my Mickey Mouse pan. ?
I have used aluminum foil to make shapes then filled with concrete powder and added water and mixed it up until firm. Doing it this way I didn’t have any premixed wet concrete left over or not enough mixed up. I didn’t grease the foil, it was 3″ deep, and the foil peeled away easily when dried. I made a
2′ long 1′ wide 3″ deep fish for my flower bed.