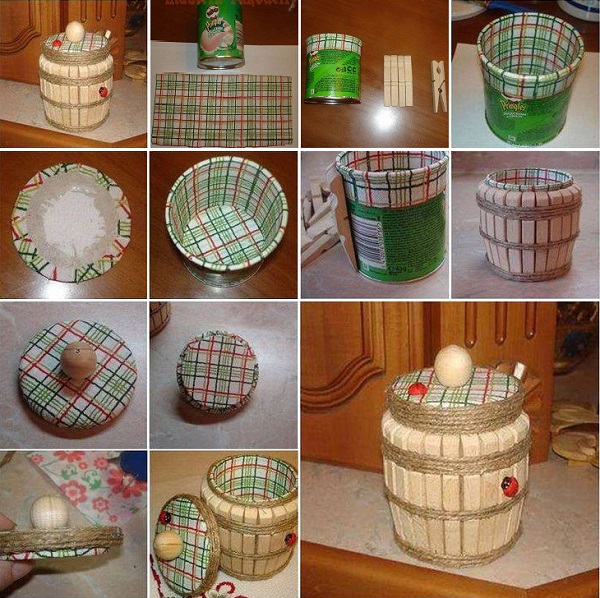
Have you ever run out of DIY ideas? This is the right place on the internet where you will always find interesting tutorials and handmade projects to implement in your home. In order to make this impressive small barrel or container out of regular clothespins and a can of chips, here is what you will need to do. Make sure you have the following materials before you start building your small and cute DIY barrel:
• a small can of Pringles;
• a bunch of clothespins;
• a glue gun;
• some nicely patterned fabric;
• a pair of scissors;
• a roll of rope;
• a round lid you will fashion;
• a small wood knob;

Start by covering the inside and top part of the can of Pringles with the desired fabric. You can use double-sided tape at this point. Do the same with a lid. You can take any jar lid or better yet fashion one from a piece of cardboard. Use the glue gun to attach a circular block of wood (which should fit slightly into the can) to it and cover this whole structure in fabric. No need to worry about the fabric being securely in place even because it will be mainly covered with rope and wood later on. Now, dislodge the clothespins so you are left with only the individual sticks of wood to work with. Take the glue gun again and attach each half of the clothespin to the can, like shown in the picture. When the entire can has been covered with clothespins, use rope to tie around them. This is for decorative purposes as well as practical ones. Three separate layers (one at the top, one in the middle, and one at the bottom) of rope should suffice. Next, glue the wood knob onto the lid and the rope at the base of the lid. You can add a couple o ladybugs to your nice piece of decoration. It looks great!


I absolutely love these posts! So many different and creative ideas! Best site I’ve found! Love it!