Holiday preparations often include a vast shopping list. For the kitchen, for the kids, for the guests, everyone rushes to buy something in order to bring some Christmas joy to others. You could still do that by not stuffing your house with more things, but reusing some of your old objects. Stop your voyage to the mall and take a trip to your kid’s room instead. Find a pair of mittens or socks that aren’t used anymore and start the DIY mania. You will need:
• mittens;
• socks;
• rice or beans;
• rubber bands;
• Styrofoam ball;
• chopstick;
• a pair of scissors;
• glue;
• marker
• buttons and other decorations;
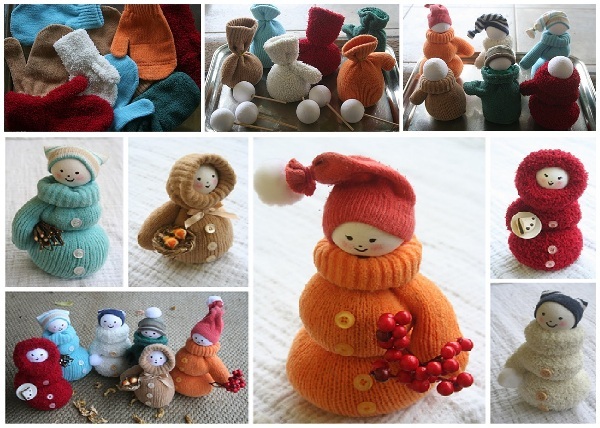
The first step is to fill your mittens with rice or beans. In this tutorial was used two-finger mittens. Be sure to stuff all the fingers as we will turn one into the hand of the doll. Place some rubber bands to create a nice looking silhouette. Don’t tie the top of the mitten!
We leave this open in order to fashion a head for the little character we created. Take a Styrofoam ball and poke it with a chopstick then insert into the rice-filled mitten. Use the marker to draw a face on the ball, turning it into a realistic looking head. Decorate it with a hat, made out of a sock from which you cut off the fingers and rubber band it closed. Glue to the ball to make sure it doesn’t fall easily.


oh my Lord, these are ADORABLE!!!!!
These are so cute! Wanted to make them, but I cannot find inexpensive mittens like that anywhere !! Help!!
Try your local thrift or second hand stores……..that is where I find a lot of my crafting wants………that I don’t want to pay top dollar for and if you are a sew-er check out the selection of bulky sweaters (use something like Fray Check to keep it from unraveling)
If you have a Dollar Tree or any kind of Dollar Store near you try looking there because that is where I found mine or you can look at any second hand store like Goodwill.
i found some at the dollar store might check there for the mittens
Confused with the hat it says to use the sock from which you cut off the fingers, socks don’t have fingers. I’m sure I’m missing something!
I tried to PIN it but it blocked it…saying something about being inappropriate content…SMH
I think what she means by the hat thing is that you cut off all the toes from a sock. Then you put the ankle end of the sock on the head. You tie the cut end of the sock together either with string, ribbon, or rubber band. You can glue a cotton ball to the end to get the puff at the end of the hat, or attach any decoration you like.
Love to make things
Yes, they are adorable, just not crazy about a one arm snowman.
Where do you click to get all the step by step instructions?
I’ve never seen two finger mittens… thinking she means regular mittens that have one area for fingers and then a separate thumb?
I have seen gloves cheap at the dollar store… never saw mittens though.
Directions are a bit vague. I realize its not rocket science, but how about step by step?
It is a good thing there are pictures for this tutorial because the instructions say use a 2 finger mitten and a sock with fingers. But with the pictures I think I can figure this out.
Do you think a lollipop stick would work in place of a choptick?
Direction on mitten snowmen please
I found mittens at a dollarama store here in Hamilton, Ontario. They were only $ 1. 25 or $ 1. 50
Are there step by step plus photos? Haven’t found them?