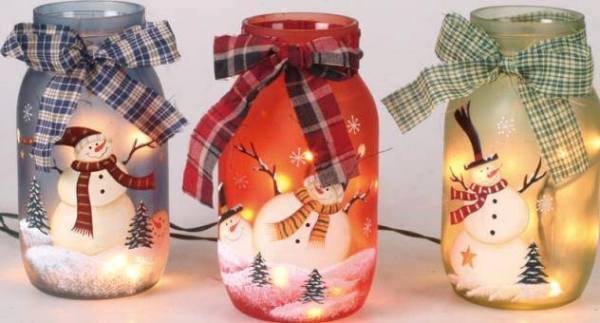
Here is a cute tutorial for a DIY project which consists in a painted jar that has a snowman on it. So we’ll just call it Snowman Jar. As the winter holidays are approaching we thought this tutorial will help you bring the holiday spirit in your home. This craft was created using a glass jar, but you can also paint this nice snowman on any other surface, such as fabric and even wood. So here are the supplies you will need for this project:
• one glass jar (in this case)
• one liner brush
• one shadier brush
• one smaller brush
• brown and black colored craft pens
• white pen
• a toothbrush
• acrylic spray sealer, a matte one
• the pattern of the snowman
• and acrylic paint for the snowman ( green, white, red, blue, brown, golden and any other colors you’d like your snowman to be)
And now, let’s see the steps for making this craft:
1. Be sure that your jar is clean and label-free otherwise the paint won’t look good on it. So you’ll need a clean and washed surface on which to paint.
2. Apply the first coat of paint on the jar. In the picture we found this one was green, but you can get creative and use any other color you want. Let it dry and then apply a second coat of acrylic paint of the same color.
3. Now trace the pattern of the snowman and then start with painting the body, its clothes and cute face. For this you can use any of the colors above. Just let your imagination run free.
4. Now paint its arms and other little details such as the buttons on its coat. Again, you don’t need to make your snowman look just like the one in the picture we found, use your creativity to personalize it.
5. You can now use the black and brown pen to add some stitches to the snowman’s clothes. All you have to do now is write the text that says ‘snow place like home’ and with the use of the toothbrush, splatter white paint all over the jar. Looks like real snow, doesn’t it?
6. Now the last step is to take the acrylic spray sealer and spray the whole jar 2 or 3 times in order to fix the paint.
And that is all you need to do, to re/create this cute holiday decoration, that we are sure your children will love too.


How do you get the holes in the jar for the light strand without breaking the jar?
Maybe it’s a tealight candle?
Use battery tree lights….
You use a ceramic tile circluar drill bit.
You can use battery operated lights.
Use battery operated Christmas lights.
You use a diamond drill bit 🙂
You can drill a small hole in the bottom of the back.
Why do these ones look like they have lights in them?
porque pones unas velitas dentro de él
How do you get a pattern for the snowman
The backgrounds look like they were spray painted…lightly.
I was thinking why couldn’t you use, Wide mouth jars and put a candle in it, that would be cute, you think?
im planning on doing a wide mouth jar and painting it then adding sand at the bottom and then putting in a votive candle
They use the small strands of lights that use batteries…..or you could also use one or two of the small battery candles…..
Maybe you can use decals or clings.
I would like the patterns for the snowmen. Where can we get them?
What type of paint is the first lare ?? it looks sprayed to me
How do we make it so light string can be placed inside??
To get the lights you have to drill a hole in the back of the glass with a glass drill then thread the lights through the back.
Where do I find the patterns??
You use a diamond drill bit, they cost about 2-30 dollars you can purchase it at any hardware store and drill a hole into the mason jar.
You could paint the snowmen free hand, just make one c one side of the snowmen then another c the opposite side fill in the center and thats it.
Directions aren’t complete. I am not artistically inclined to draw freehand. I would also like/need pattern for the backgrounds and snowmen! They are so cute! Especially with the lights inside the jars!!!!!
Also required is tracing paper, and I would just put a tea light candle in the jar, not try to drill holes in it for a cord.
Our Dollar Tree has battery operated indoor lights that I bought for my little one to decorate her Barbie doll house…thinking they would be perfect. Only takes 2 AA batteries and are a soft white instead of the super bright white LED kind. 😉
I also would like the patterns for the snowmen and the patterns for the background.Thanks for any help. I also have a craft facebook page at Granee Pavers and More Crafts.
It must be spray painted as I just completed one with the two layers of paint, etc. per directions and when you add the lights you can see streaks from the paint and the snowman can’t be seen. Disappointed