There is an easy and interesting way you can have a fairytale Christmas and not spend nearly half of your month’s salary on mass-produced items. Instead, use that money on your loved ones, and make your own decorations. Start with these inexpensive DIY stemware snow globes.
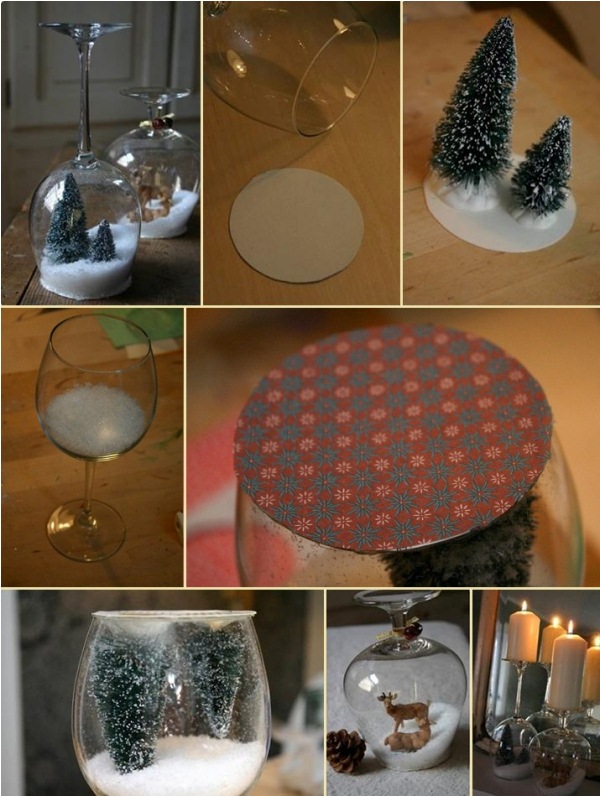
To begin, you will need stemware (a brandy glass and a red wine goblet from IKEA does the trick as well), small plastic reindeer or other Christmas figurines you might think off, outdoor miniature scenery are also useful, artificial snow or glitter, a cardboard, marker, pair of scissors, hot glue gun.
First thing to do is use the marker to trace the circumference of the opening (glass placed upside down) on the cardboard. Cut the resulting shape.
Second, using the hot glue gun, attach whatever Christmas miniature objects you thought will look good in your snow globe, to the cardboard. If you don’t like plastic little reindeers and such, go with the alternative: a photograph, pinecones, old jewelry. They are just as suited for the job.
Then, pour some glitter or artificial snow (a few tablespoons will suffice) into the glass. Afterward, line-up the rim of the glass with hot glue and press it on the cardboard. You might want to decorate the bottom of the cardboard to give it a more festive look; i.e. with some origami paper.
To cover the sliver of the cardboard base what will be poking out from the rim of the glass, use some glue on it and cover it with a little rain of white glitter (or artificial snow for that matter).
For the final touch, you can add a candle, a pine cone or ornament on top. Or just leave it as it is. You will definitely enjoy it during this holiday.
Photo credit and more details at: Cfabbridesigns.com

