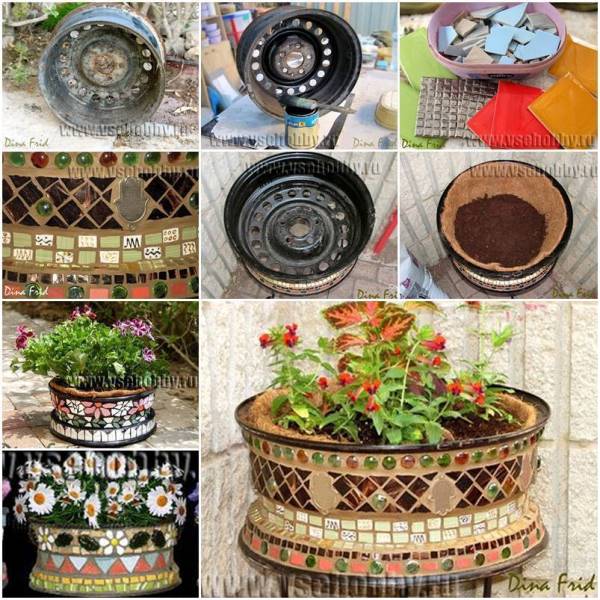
Who would have thought that this lovely and colorful flower pot is actually an old rim? Even if you aren’t a fan of repurposing materials that are lying around the home, rusting away, you will definitely like this DIY project. So, raise your sleeves and get to work. To make this artistic and chic piece of outdoor decoration, you will need:
• an old rim;
• a can of black paint;
• broken pieces of tile;
• (optional) beads;
• brown piece of felt;
• clay;
• fertile soil;
First, make sure you clean any rust off the wheel and prepare it for painting. Apply a nice coat of black pain on its entire surface. Next, take a small cutter on the (broken) pieces of tile and fashion them into little chunks which will go nicely in a pattern. When you are satisfied with the model you’ve prepared on the side move to the next step.
Apply a layer of clay on the outside of the wheel. Before it begins to dry, place the tile pattern. After the pieces are lodged into position, meaning the clay has dried a bit, remove any excess with a wet cloth. Then, put the piece of felt inside the wheel, pour the soil and plant your flowers. When you think this was just an old wheel, it looks amazing!


Hi there would love to make the wheel rim planter but not sure what clay you would need or where to get it from could you help me please.My husband suggests waterproof floor adhesive and grout ??
Kind regards Bea
I think your husband would be right there, Bea. That is what I would use…though, I would either abrade the surface of the metal (with a coarse abrasive sanding disc on a small angle-grinder) or use a good metal primer, with a handful of sand mixed in, to help the adhesive grip. Also, to make sure that the adhesive and grout are frost-proof ! 🙂
I would suggest grout also. Clay won’t hold up and yet I am using it to make fairy houses and such…Anyway, use grout…you will be better off!
I’m wondering the same…what type of “clay” do you use? What about a grout used for tile projects? This is a cool idea as my husband restores muscle cars 🙂 Thanks!
The adhesive is called Tile Adhesive and it is ready made for application. No need to mix anything with it. You can ask at your local hardware store for a recommendation on the grout. Or perhaps brick mortar. That is what is used for blocks and bricks outdoors. Find out if it can be colored as well. Hope this helps. My husband is an all around handy man and lays bricks, blocks and tile floors.
Hi. I’d also like to know what clay to use. It looks beautiful !
May try plaster of Paris or such from craft store of choice
Unfortunately, plaster of Paris is fragile and will crack under any kind of pressure. Also, not waterproof. Sorry. 🙁
May try clay (plaster of Paris) or the like from a local craft store of choice
I love the idea the pots are really pretty, I will be sharing the idea with my clubites and try to make one myself.
I was gathering supplies for the rim planter as my dad used to mine turquoise and I don’t know howto apply to the rim. can some one help me.
Wow, marvelous blog format! How long have you been blogging for? You made blogging seem easy. The whole appearance of your website is magnificent, as neatly as the content! Thanks for sharing and I will mark this to come back again. I am delighted that I discovered your blog while doing a google search. Your right on the mark with the details you provided, Thanks again.
C’est tout simplement magnifique, j’adore.
Bravo à vous !
Plaster of Paris is not outdoor proof or even very waterproof.
Instead of clay I would use a grout made for the outdoors.
They don’t even show that step so we can’t see what it looks like. Another thing I noticed they said to use felt to line the inside of the wheel, but it looks to me like the stuff you put in the open wire baskets. It’s thicker and made to be outside and to hold flowers. I also had the idea of a fairy garden. I think I will use this one for an outside one, so far they have all be inside. Good luck to all.
The “brown felt” is actually coconut fiber. It can be found anywhere you can buy outdoor planters. It’s a good liner that allows water to flow thru while retaining enough water to keep the plants moist.
I have a feeling it might be pottery clay. When it dries it would be okay in the elements, I think. You could, also, put a sealer over it all.
WOW….AWESOME. THIS IDEA INSPIRES ME TO GIVE IT A TRY AND SEE WHAT HAPPENS! MY HUSBAND HAS DONATED ME MY FIRST METAL TIRE RIM. WISH ME LUCK!
Love this concept and designs but “clay” ? as in sculpting oil based clay? or potters clay? both way to vulnerable to actually hold.over time. These directions are too simplistic, In order to mosaic on metal one needs to prepare the surface clean, painted and yes some abrasion creating some tooth would be recommended and an appropriate adhesive must be selected like liquid nails, mastic, silicon chalk (traditional tile adhesives suited for concrete would not adhere as well) after drying sufficiently a couple of days then grout with Thinset or a sanded grout with plenty of polymers in it, and I would recommend a couple of coats of grout sealer (applied on the grout) making sure to clean it off the tiles as you go to avoid hazing. I like the water based types.
The materials list needs to be corrected/modified.
The “brown felt,” as other people have noted is coconut fiber, used for hanging plants.
The “clay,” as many people have questioned, is likely not typical clay – not potter’s clay at least. Clay needs to be fired to have the water removed on a chemical level, or at the very least, mixed with other materials to create a mortar. Simply air drying regular clay alone will leave it water soluble and weak. A tile adhesive, and grout would be a better option.
I covered an old bowling ball with pieces of broken tile using water proof clear silicone adhesive and then i grouted it using tub grout. It has been sitting outside for 3 years through some pretty harsh Indiana weather.Looks as good as the day I put it out there