Christmas trees come in all sorts and sizes, especially in the DIY area. The term `Conceptual` Christmas tree comes from a personal experience; in opposition with the expensive and commercial types of trees you can find in shops, the conceptual one transmits the holiday spirit, without costing enormously or serving any other purpose than making your holiday a bit more happier. So, for those wishing to create a simple but original alternative to the costly natural Christmas tree, or just add zest to a New Year decoration, follow the instructions below. To get started you will need:
• a sheet of drawing paper;
• some tape;
• thread thicker PVA glue;
• a plate with water;
• brush;
• a pair of scissors;
• garland;
• Christmas toys and small work clothes, so as not to get dirty;
Method number 1
There are 3 ways in which you can make the `Conceptual` Christmas tree. In the first technique, the technology is similar to the long-established way of doing fishnet balls, reeling thread with white glue on balloons.
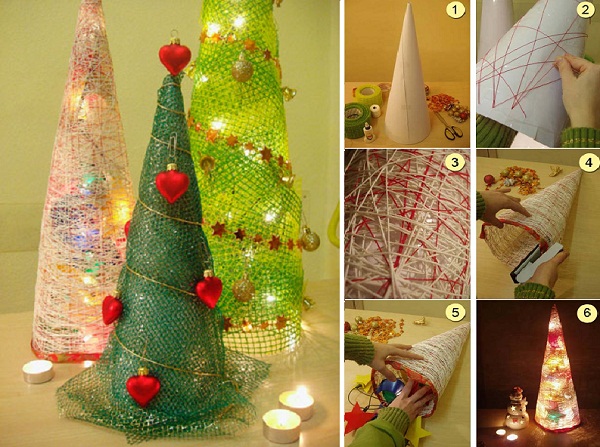
1. Turn your sheet of paper into a cone shape.
2. At the bottom of the cone make incisions at intervals of about 1.5 – 2 cm. This is done so that through them you can stretch the thread, just like in the image.
3. Pour PVA glue in the bowl with water, until it has the consistency of milk. Now comes the important procedure: to make the tree itself, you have to stretch the thread through the diluted glue and wind on the cone. Be warned this will make your hands and worktable wet and sticky.
Although it might seem too diluted, the PVA will make the thread very stiff when it dries. You can experiment with different colors, thickness and texture of the thread. The traditional Christmas colors – red and white – are recommended.
4. When the DIY tree-like creation has dried, you need to carefully separate the paper cone from the `Christmas tree`. Stick some gift ribbon at the bottom. You can do this with a needle and thread, or simplify the procedure with a stapler.
5. Place a Christmas garland of lights inside the tree. Attach it with a few paperclips.
6. Lights passing through the filament frame will give whimsical reflections on the table and walls, creating a romantic atmosphere of the holiday.
Method number 2
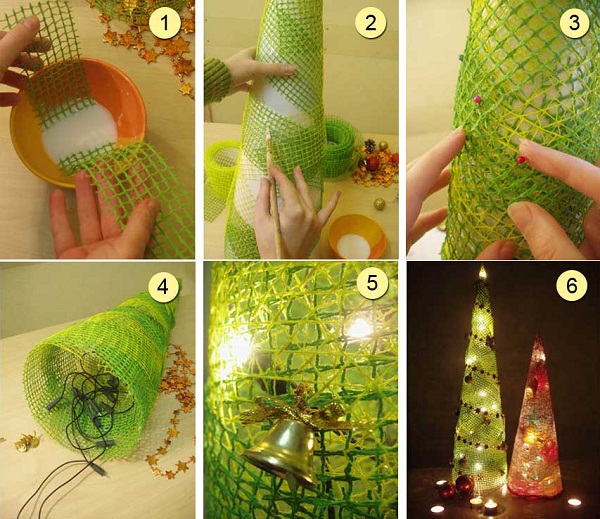
1. Make a cone from paper in the same way as the previous method. If you decide to create several Christmas trees, you can make them in different sizes. Instead of the thread, use a flower mesh you can buy from the store in combination with the PVA glue and water as before. You could also apply the solution on the mesh with a brush while you place it on the cone.
2. At first glance, this method seems to be less time consuming than the winding cone thread, but actually requires more skill and patience. You can cut the mesh into small pieces or mount it with tape or pins and then brush the PVA on it.
3. Alternate two or more colors, placing it in different directions on the cone. Usually mesh is rigid so you have to use pins to attach it properly to the shape, until it dries. Give each layer time to dry before gluing a new layer.
4. When it all dries up, remove the paper cone from the base.
5. Placed a garland of lights inside the tree.
6. Decorate your Christmas tree with bells, balls, or beads.
Method number 3
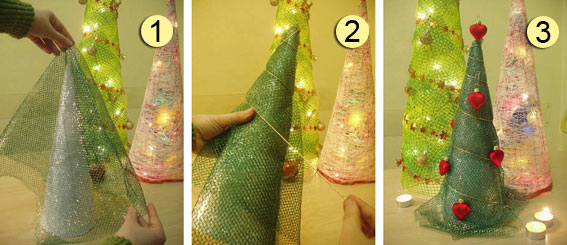
1. Use the same paper cone. Take a soft mesh for bouquets. Here we used a green one with golden thread, but your tree can be whatever color you prefer.
2. Wrap the mesh around the cone with a decorative lace.
3. Hang some Christmas tree balls, bells and angels on. Put all your creations on the Christmas table – to the delight of your friends and guests!
source: www.domnaraduge.com