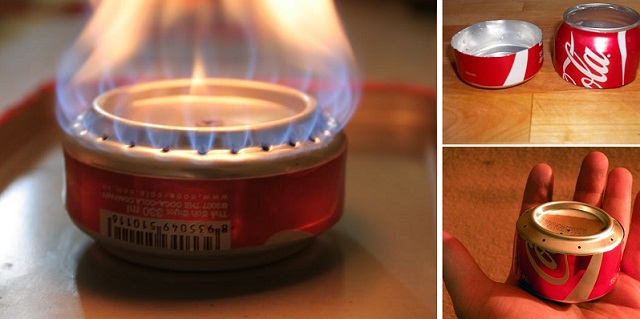
This next idea is so great and very easy to implement in case of emergency or when camping. The tutorial is going to teach you how to make a small stove out of a soda can in just a few minutes. Aluminum is the lightest of metals and due to its flexibility and strength it’s most often used to manufacture everyday products such as beverage and food containers. So by trying this project, you can also reuse your containers of soda and contribute to the reduction of environmental pollution. If you follow the steps from the link you can build (with few materials and minimal skills) a portable stove for travel or cooking in case of energy blackouts.
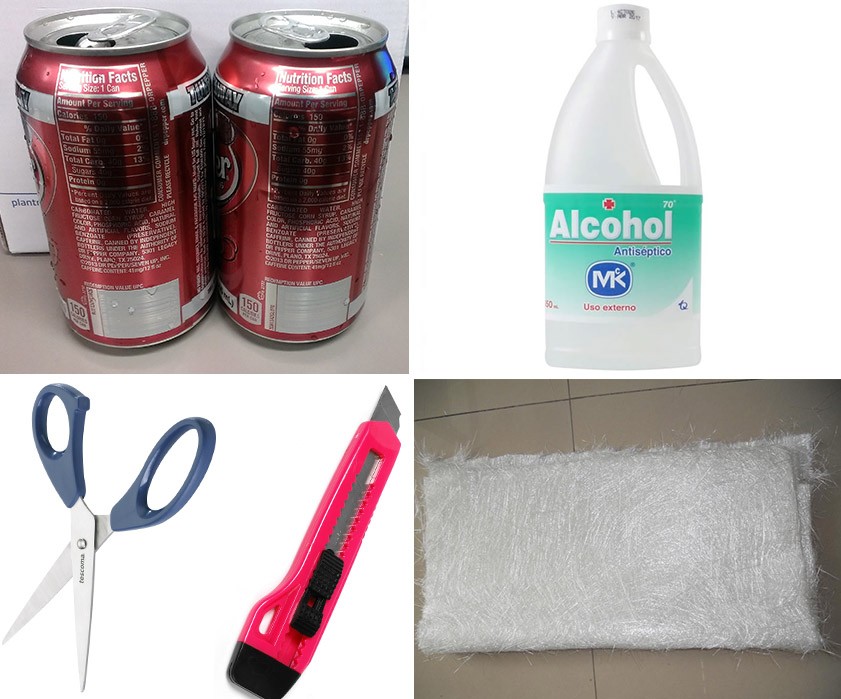
The supplies you are going to need are: 2 aluminum cans of any soft drink, 1 marker, a pair of scissors or cutter, 1 small sandpaper, 1 nail, alcohol and fiberglass. The step by step tutorial can be found on the link below. Happy crafting!
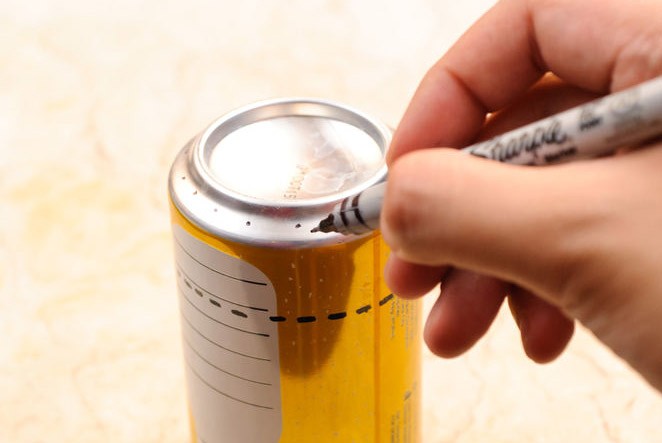
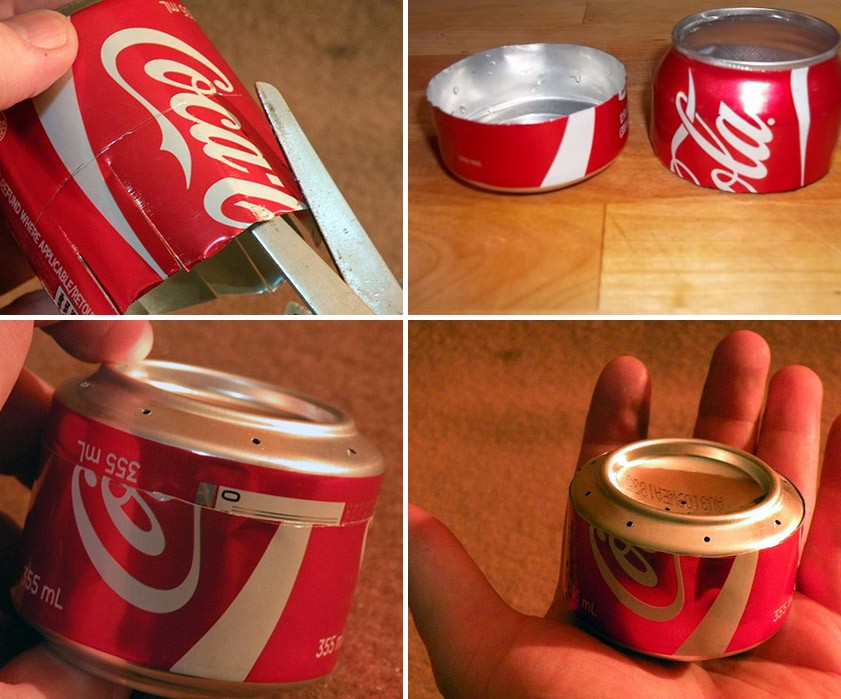
- Cut 2 coke tin can into 2 bottom parts
- Make holes in 1 of them
- The next step is to nest the two halves together, top into the bottom.
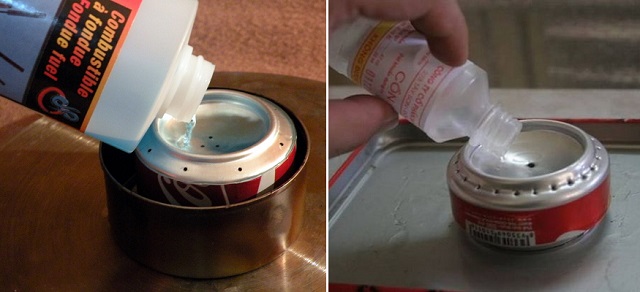
- Fill the concave cavity with fuel
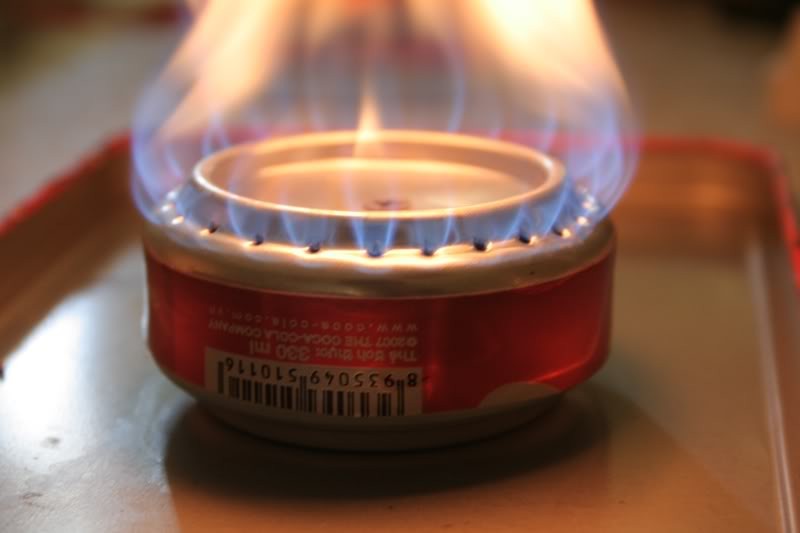
Finaly, this is the fire from your Stove for Hiking and Camping made out of Coke / Beer Tin Cans..
Photos from: Easy Diy, Mungo Says Bah


Check out Instructibles.com for more versions and a lot of other cool “ibles” for making stuff yourself, much of it out of whatever you have around.
Cool idea .Really poorly written directions. What is the purpose of the sandpapet?
This is true
Sandpaper. Maybe rough edges.
What about the fiberglass?? Instructions are really quite anemic.
Leslie, I’ve made hundreds of the same Denatured Alcohol stoves, my first step is to use a small in length awl (my awls are made by a company C. S. Osborne & Co #478, you can Google the name and you’ll find the number, the awl is 4″ long, for me personally I have big hands and fat fingers, the awl fits perfect inside the palm of my hand) and cut out the end of one of the cans with the awl and use the rounded side of a metal file to smooth out the inside edge, this piece will of course the top of the stove, the only marks I make on my two cans is at the top edge of the UPC bar code box is a fine point Sharpe as a straight line guide to cut the cans evenly, I make a ring/circle of thick paper (the can itself is like your finger, the ring of paper is like a normal wedding ring that fits around the outside of your finger, I’ve used a strip of the paper which makes up the carton of a twelve pack of soda, my strip is 3″ wide it should fit around the can snugly, once you make the outside ring template, it can be used over and over again), I mark both cans the exact same place making both identical in height, the reason for the sandpaper is to smooth any sharp edges after the cut, personally I use both a curved side of the metal file and my thumb nail to smooth the edges of both cans, the way I cut my cans is with a serrated bread knife, the way I cut the center wall/ring is from the top part of one can above the center section (mine measures 7″ long X 2 1/2″ wide), ok so now you’ll have two identical in height cans one of which has it’s top center piece removed and you have the center wall strip which you’ll make a ring of (like the ring template you made out of the soda 12 pack) (maybe now you can understand how difficult it is to put into words how to make one of these alcohol stoves, I’m trying to explain the process without pictures, the best way to learn to make a pop can stove is watching a craftsman make one in person, ie, I’ve taught dozens of boy scout troops how to make them, I suggest you go to YouTube and type in “making a soda can stove”, if you live anywhere close to southern Utah during the winter (now) or southeast Idaho during the summer I could come to you and teach you and Tanya how to make them, it is dang hard to explain the process using mere words?), so now look down to the bottom of the stove base and you’ll see the center ring of the can, take the 7″ X 2 1/2″ strip of can and make a ring out of it using scotch tape to hold the ring together, it must fit ‘very snug’ around the center ring in the bottom section, make adjustments to the ring until it does fit ‘very snug’, turn the inner ring upside down so you’ll know the ring is as round as possible on both edges (I personally have never used fiberglass in any of my stoves but you can if you want to, to use fiberglass, fit the inner ring down onto and around the center of the bottom half, cut a short strip of fiberglass the height between the center ring and the inside edge of the outside of the can, I’ve seen videos of others that do use flat sheets of white fiberglass which is cut with scissors or you can use the pink fiberglass kind, I never have used it), by the way, the inside ring/wall should be about 1/4″ taller than the outside of the can diameter, also, because you’ll be pressing together two halves of the same diameter of metal you’ll need to cut with scissors 1/2″ cuts into the bottom edge of the top half of the stove to help you start pressing the two halves together, now comes the hard part, WARNING, DO NOT GET IN A RUSH, place the center ring/wall into the bottom of the stove, the top open end half of the stove goes into the bottom half, use the four vertical cuts of the top end of the can to help you start pressing the two halves together, now, once the open end is getting close to the inner ring’s top edge, the center wall ring has to fit inside the open ring, go very slowly making sure the top edge of the ring wall fits around the inside ring of the top half, once the inner ring is fitted around the top ring keep pressing the two halves until you can’t press them together any more, you are now holding the complete stove body in your hand, the two halves and the center ring should stay together without any type of glue or any other type of glue! Now, using the awl (this part is very tricky), four small holes must be punched through the very base of the inner ring to allow the alcohol to flow into the space between the outer part and the inner wall, place the tip of the awl where the center part of the can and the bottom of the inner wall meet together and ‘ever so gently’ push the tip of the awl through (be VERY GENTLE and do not push hard so that the awl goes through the outside ring of the bottom half, if you do happen to go through both halves you have to start all over again from scratch), after you’ve punched the four holes now your going to punch the holes on the very top of the stove where the flame comes out, obviously small holes opening up the space in between the outside and inside walls, I do not use a drill and drill bit, I use the tip of the awl, I start at the very bottom of the ring ridge on top of the stove and ‘gently’ punch your first hole, try to ‘make a small hole’, go directly across the can and make your second hole, now turn the can making your third hole as perfect a place in between the first and second holes and the directly across from the third hole punch in your forth hole do the same until you have small hole all the way around about 7/16″ apart, the stove is now complete 🙂 I have always used Denatured Alcohol as my fuel, rubbing alcohol will burn but you’ll use twice as much because it doesn’t burn hot enough, you can use Heet brand gas line antifreeze or grain alcohol ‘Everclear’ from the liquor store, I go to the local hardware store and purchase by the quart or gallon Denatured Alcohol in the painting isle, it is used to clean paint brushes, some thin the paint with it. Pour in enough to cover the bottom third of the open part of the stove, wait a few seconds, I use a normal lighter and have used the long thin ones I light my barbeque with, denatured alcohol won’t flame up large like gasoline would, it starts out very gentle with very little flame, the interesting part of all this is once the alcohol is burning it burns a blue flame only in the open part of the stove until the heat produced turn the liquid to a vaporized gas which is trapped between the outer and inner walls, this is when the blueish/yellow flame will start burning from the holes you punched with your awl and then the blue flame in the open part will go out, basically the heat produced will boil the alcohol, a little over 1/4″ of alcohol will boil two cups of water in five minutes, while the water in my titanium pot is heating to a boil I pour in my Lipton noodles and sauce until the water is rolling boiling stir in the ingredients, put the lid on for five or so minutes and dinner is ready. I describe what I use as a pot stand, I buy ‘masonry cloth’ is what it’s called, it’s made of chicken wire sized metal, I buy the 1/2″ size and cut out a piece 1/2″ taller than my pot, make a round ring from it and place my pot on top of the ring, after I eat I wash out my pot and place the stove & pot stand ring into the pot replace the lid and spices salt pepper whatever else fits and I’m good to go 🙂 So now I have a question, is everyone lost now? :))))))
I just noticed something that differs from the stoves I’ve made, his stove does not have the open top and no center ring, for his design I can see why he used fiberglass insulation (the pink stuff), same principal as mine and his could be made in ten minutes or less!!
What is the fibreglass for?
I’m assuming the fibre glass goes inside the cans as there is no me tion of what to do with it?
Because everyone carries nails, sandpaper, and fiberglass while hiking.
I think the idea is to make one to take ALONG hiking
Wait, so what’s the fiberglass for then? You left that part out of the instructions…
That’s very cool but what is the fiberglass used for?
too many steps are left out… what is the fiberglass for? …it says to use fondue fuel (sterno) so what is the rubbing alcohol for?… what do you use the sandpaper on?…
Just a few items….
1. What is the sandpaper used for?
2. What is the fiberglass used for?
3.There are two bottles shown, what is in each? Alcohol is mentioned, one appears to be sterno or fondue fuel of some kind.
Sandpaper to smooth out any rough edges, fiberglass is used as a sort of a sponge to hold the alcohol better (I’ve never used it in any of the hundreds of stoves I’ve made by hand), denatured alcohol (it burns hotter than rubbing alcohol, sterno or fondue, beside denatured alcohol is way cheaper than any of the rest! You can use Heet in the yellow bottle or Everclear grain alcohol from the liquor store.
It says the step by step instructions are provided in the link below but there doesn’t seem to be any link? The few istructions in this post itself aren’t enough.
Regards,
Jess
Go back up the list a bit further, using his pictures you can use them and my book length instructions to make your own pop can stove, your first few won’t be perfect, making them is like everything else, it takes practice, I’ll put it to you this way, I’ve taught dozens of boy scout troop kids to make them and 95% of their stoves burn hot as ever just like mine do. Me personally, I like making them ‘by hand’, the only jig I use is the 12 pack soda carton paper strip, everything else is all by hand 🙂
What is the fiber glass for?
What is the fiberglass for?
I Believe the Fiberglass would be used as sort of a wicking material, like the inside of a Zippo lighter.
After making hundreds of these ‘denatured alcohol stoves’ myself, the fiberglass is used to prevent any sloshing around of the alcohol, yes on the wicking theory but these type stoves burn the vaporized denatured alcohol trapped in between the outer and inner rings, wicking isn’t necessary, once the stove is lit and is burning hot, all the fuel is burned off, unless an air tight pot like object is placed over the stove taking away it’s oxygen supply thus turning the stove off, why would it be necessary to put the stove out 🙂
What is the sandpaper for?is it inside the can?
Think it’s use after cutting can need to sandpaper round the can to smooth down sharpness
Correct! Here again, I’ve never used sandpaper, I use my thumbnail and the rounded side of a metal file to smooth the edges.
so whats the fiberglass for??? this is a great idea bit its not very explicit. 🙁
How do you safely put fire out?
Just throw a cup or bowl upside down over it to snuff out the flame.
Once you have your stove made, with a little practice you’ll learn how much denatured alcohol to fill the stove with to be able to boil two cups of water for whatever noodles and sauce meal you’re having for lunch or dinner, once the stove is burning there really isn’t a reason to turn it off 🙂
What are the sandpaper and fiberglass for?
Only one question what it the fiberglass for and when do you use it… thanks
what is the fiberglass for?
This does not explain why you need fiber glass, sand paper or rubbing alcohol (as the pictures clearly show fondue fuel being used). It also does not explain how you keep the flames from coming out between where the two cans over lap.
I ain’t no expert but when I think on the subject, not only have I made several hundred pop can stoves and have taught dozens of boy scout troops to make these stoves but I’ve also used the stoves that I’ve made to boil water on countless backpacking trips for over twenty years, I still don’t think I’m an “expert” or anything else, they do work and burn hot as ever when you use ‘denatured alcohol’, heet or grain alcohol from the liquor store. Once you’ve made a few of these stoves, you can make one that will last forever in about twenty to thirty minutes.
The fiberglass goes inside the cans to absorb the fuel. It acts as a wicked so that all of the fuel will not ignite at once. Rubbing alcohol works as a fuel but dies not last as long as fondue fuel. Great idea!
You should put the fiber glass inside the burner, there is a risk of explosion if you don’t!
The sand paper should be used to smooth the edges after cutting, so that you don’t cut yourself and can put the two pieces together.
You can use some tape to stop flames coming up between the gap.
The alcohol is fuel.
You can use a third bottom, make it a bit wider with a small hammer, to use to put out the flame and to transport the burner with fuel still in it.
common sense is real common anymore
To many questions, no common sense
The sandpaper is unknown. The fiberglass is to hold the alcohol, like a sponge. The flames are fumes burning, and they will escape out of the edge holes easiest so that’s where the flames will burn.
I think.
Do not test this. It blew off last night when tested !
We used to make these in our Boy Scout troop every year. We never used fiberglass. As other people have suggested, it might be usable as a “sponge” to hold the alcohol so it’s not just sloshing around. The stove definitely works without it. One thing that’s missing is that we used to put a penny over the fuel filler hole in the middle and then prime the stove by pouring some alcohol into the bowl on top. You light the alcohol in the bowl which heats up the stove enough for the fuel inside to start vaporizing. Once it does, it will burn until the fuel runs out.
Duh…the fiberglass would be optional, but as an adsorbent pad for the fuel. The sandpaper is for the rough edges. Otherwise, if you can’t figure this out from the pictures, you should not be playing with scissors.
Wow! Someone needs a nap! How .rude
shut ur mouth u filthy whore
The fiberglass is a wick, you place it between the parts. The alcohol is fuel, but there are two construction pictured. One of them is using fondue fuel. Sandpaper is for smoothing sharp edges and burs from cutting can. Flames shouldn’t come out from underneath (overfilling maybe) as fumes go up and the two pieces are the same size so they should be snug. You have to smother it to put it out (metal bowl, bigger can, etc.). Altoid cans and sand also work, similar to the mre stoves soldiers would make. Pretty much use the can you want to. Make a real cheap portable campstove with paint cans and eyes like these
The fiberglass isnt needed , it can be used inside the can as a wick to keep the alcohol contained some. It is not really necessary. If you go to YouTube and type in penny stove or coke can alcohol stove you will see a hundred variations on it and they all work.
The sandpaper is used to take the paint off the can so you could have just a silver stove. Once again sand paper isnt needed.
Any liquid fuel can be used. The best is called Heet and is in a yellow bottle found at auto stores and Walmart for sure. While your putting the two cans together the top should go over the bottom preventing the flames from coming out.
Fibreglass is for soaking up the fuel so it does not spill out.
It’s meant to be used to absorb the alcohol, but I can honestly say having made several of these for my nephews that you are better off using good old fashioned cotton wool, this way when the alcohol burns off you don’t get any noxious fumes which can end up poisoning you .
This looks cool, but considering that the cans are thin aluminum, in no time at all the cans would begin to melt especially at the pin holes. I would not consider this to be a safe stove. Anyone who has thrown a beer/pop can in a fire pit will know, they melt. It would be much better and safer to use metal cans such as those for beans. They are heavier and can handle the heat much better. However cutting the tiny holes would be very difficult without a drill.
Check out “Bomber” above, if you don’t believe me. Alcohol doesn’t burn hot enough to melt aluminum. Of course, you can use steel cans, and you won’t have any real weight problems, but they are much harder to form.
Sand paper to trim sharp cut edges and fiber to put inside to make the fuel burn longer. Cover with wet cloth to put flames out.
You just answered your own questions. The sand paper is to smooth the inner can, the fiberglass is meant to go in between both cans to stop a flare up between the cans, and the alcohol is used as a fuel however the flame is invisible during daylight.
I assume, that the fiber glass has to be put inside the can, to prevent spilling the alcohol. The sand paper may be used to prevent harming yourself by sharp edges from cutting the can.
For those of you that have never crafted things like this….
The sandpaper is just to smooth out the edges of the aluminum, probably focusing on the inside where the punctures were made from the screws, so there is a nice even area.
As for the fiberglass, I’m assuming this will be the kindle you cut to size and put inside the can contain you made. There are many other options you can do, I would shoot for wool myself.
The alcohol is simply starter fluid. You can use actual starter fluid or a combustible fluid like they used in the photo. Alcohol is the most basic and cheapest option of course.
On a side note, I would soak the kindle in the starter before putting it in the can so you have a ready to light burner when you’re traveling. 🙂
I assume the fiberglass cloth goes inside the burner to act as a regulator for the vapor and to help keep the fuel from sloshing out upon movement. It would be nice if you would edit the instructions to include a photo of this operation and the link to the alleged step-by-step instructions. Writing is more than just typing words.
“Sharing” will show how stupid you are. This obviously didn’t start off in English so the translator must have gone on holiday. In England you can’t buy ethanol or methanol without additives. It would be easier to guess what is happening if the same cans and other stuff were used in each picture.
Great idea! I guess the sandpaper is for the base? And maybe just use water to put out the fire? Looks simple enough, I’ll give it a go soon.
Just pour gasoline on it
I was amused by all the comments you all tried to figure out construction of the stove without the promised detailed instructions. My brother Donald Johnston, was the originator of the pop can stove design that uses ports (the small holes) instead of just being an open pot of alcohol, about 16 years ago. The ports regulate combustion and provide a more even, concentrated burn and faster boil times. You can get detailed instructions on this page that is still posted: backpacking.net/makegear/photon-stove/. the number and size of the ports is of some importance or optimizing stove performance; pay heed to Don’s instructions.
The fiberglass is superfluous; it is not necessary but probably does not harm. As others have noted, the sandpaper is just for smoothing the edges and overlapping surfaces. The crevice where the cans overlap should be sealed with epoxy, because the vaporized alcohol inside the can will be pressurized and will come out any unsealed openings. Normally only the amount of fuel estimated to be necessary to boil the amount of water needed is measured and used, so the flame simply goes out when the fuel is exhausted. There is no need to smother the flame, and that would be pointless anyhow, as the remaining alcohol in the stove will evaporate before next use of the stove. And aluminum is a fine material for the stove: it will not melt or deteriorate as someone has suggested; I have used the first stove Don gave me for more than 15 years of backpacking trips!
Sand paper could be used to debur any sharp metal edges left after cutting.
There’s so much wrong with that recipe, so much obvious wrong, that the means of fixing it are pretty simple.
1. Fiberglass doesn’t burn, but thanks to its fabric-like structure, it’ll absorb the alcohol to stop it from spilling. Once you cut both cans, put it into the bottom one.
2. As you can see in the picture, put the can with holes ONTO the bottom can with the fiberglass.
My friend made one at the beginning of his Appalachian Trail and used the entire time and it still works. nothing but the paint melted. move of our ever blew up.
the fiberglass is used as a “wick”
the “experts” who write these articles about coke can stoves ALWAYS GET IT WRONG! the upper half of the unit MUST go on the OUTSIDE. with the upper being in the inside as shown it can blow out LIQUID fuel if it get pressurized. the other way around it can only blow out VAPORS. i also find a stainless steal scrub pad inside aids greatly.
I think you’ve been sniffing the alcohol. .
As a a mum of nearly 60 tried making both ways. Sealed the top over the bottom used 100 NLRB hour tape. Only lasted a few minutes makes a.great explosion melted the Aussie five cent piece to the top but did not come apart as the bottom over the top
As a a mum of nearly 60 tried making both ways. Sealed the top over the bottom used 100 mile hour tape. Only lasted a few minutes makes a.great explosion melted the Aussie five cent piece to the top but did not come apart as the bottom over the top
Thank you and Merry Christmas.
(WARNING FLAMABLE) Uhhhh……Flam fa flam flam mam mamable “JUST LIGHT IT”! LOL …. Mabey it will thin the heard alittle : )
People fiberglass does not “soak” anything up and does not “act like a sponge” It’s exactly what it’s name states “glass fibers”.
Glass does not absorb liquid, it may distribute it in some way, but really. Think about it some, who’d really want to get all itchy putting this inside when it’s not even necessary anyway?
Where do u see sandpaper lol
Fiberglass is made from glass, it absorbs nothing. But it does restrain the liquid fuel from sloshing around and possibly spilling from the can as it is moved about the camp site.
It appears none of you have
been in the military and if you
are going to carry the Alcohol to
burn in it why not just take a fold up
1burner stove or cans of sterno
This is highly dangerous. Our 11-year-old was badly injured when one of these stoves exploded on new year’s day. She ended up in the children’s hospital with 2nd + 3rd-degree burns. The author’s oversight of mentioning the dangers is a bit negligent.
From what I see, go its better to get the real camping stove at walmart???