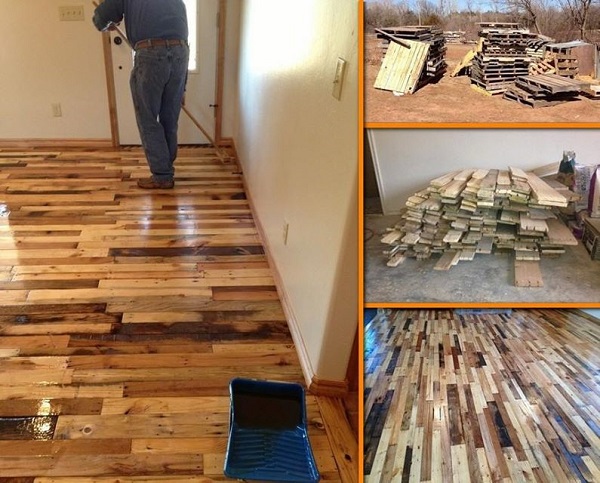
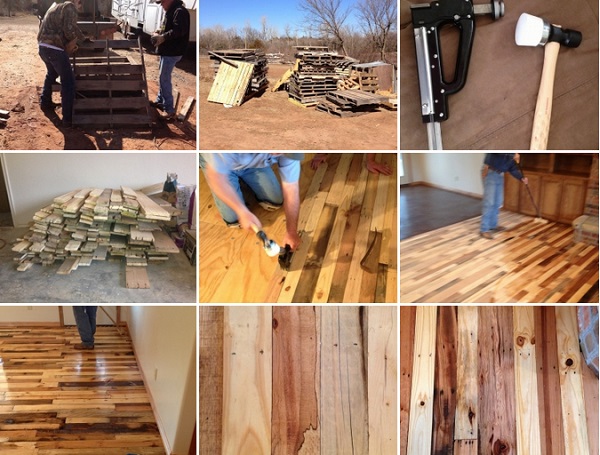
Are you decorating your home and want something natural-looking and warm? Try building your own pallet wood floor. It is actually a lot simpler than it sounds at first, you will need just a bit of patience and passion for crafting things. The outcome will be spectacular and the satisfaction that you managed to do that all by your self will be priceless. You will need the following materials:
• planks of wood (different sizes: 2, 3, 4 and 5 inch wide) from your pallet;
• mineral spirits;
• wood finish wax;
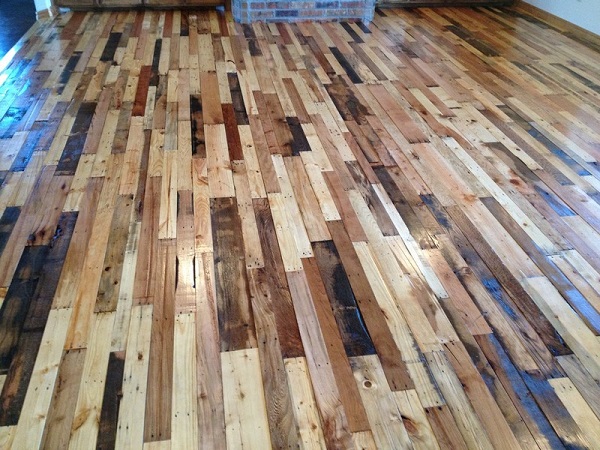
The great thing in this project is that you will be able to create your own pattern and place the planks in any order you want. Put the planks on the floor in the following order: a row of 2″, four rows of 3″, then one of 4″ followed by a four rows of 3″ and finish with a row of 5″. This is only one idea for the pattern, but you can make any other pattern you have in mind. Take the mineral spirits and apply them to each pallet. This will clean the pieces of wood and it will be much easier to work with afterwards. When the minerals have been soaked, you can start adding the finish. Congratulations! Your new floor is done now and you will definitely have to invite your friends over to show them your masterpiece.


Thank you for being one of the folks to share our blog post and actually “source” us and not another blog that has shared A Building We Shall Go!
We are very proud of our work and are happy to be the pioneers of this beautiful floor.
Rancher Girl
hey what are you guys using to seal the flooring so as to prevent splinters and provide the nice luster/? interested in doing this and was wondering what to get. the instructions are rather sketchy. any advice you can give will be a huge help. thanks
nick.
The floors were sealed with a product called Gym Floor Finish. It is a finish used on basketball gym floors. The cost was over $100 per gallon.
i would use a good polyurathane.
My grandparents built their own house over 30 years ago and used Gym coat on their hand laid hard wood floors. Using this prompts minimal upkeep and a beautiful durable floor. It still looks great after all these years/kids.
Gym floor finish is really good, but I’ve done hardwood floors and finish them with “Pacific Strong” It’s made by Bona and is a commercial floor finish that’s water based and you can do multiple coats in one day. Walk on in hours and it’s EXTREMELY durable. Last time I bought some it was about $65/gal but it covers about 500 sq. ft.
How do u guys make the wood stick to the floor? Do u nail it?
I really want to do this what tools are u useing and what are u sealing with
Sawzall, planer, jointer, tablesaw, top nailer, 1″ cleat nails, sander, mineral spirits, wool nap pad, and Gym Floor Finish. The finish is what is used on basketball gym floors. The cost is over $100 per gallon.
How much did this cost you per Sq ft?
The overall cost of our floor was much more than that of a conventional hardwood floor.
Sorry but what is the point of doing this if it is going to cost much more than a conventional hardwood floor
Of course it was expensive. You used the Gym Floor Finish I heard the cost was over $100 per gallon.
What tools are you using to do the finish? It looks like a short shop broom.
It is a low nap wool pad.
what hes using is thompsons wood finish sealer a rubber mallet and a finish trim nailer also to add to this if you have a sander you can sand down the wood to give it a nice finish and you can also but a stain color of your choice from red wood walnut etc would give a nice look but just use it on the floor you can use it up the walls to or half and half and diffrent designs on the wall like a diamond pattern or up and down or side to side or diagnaly the possibilitys are endless and you can always find wooden pallets like from your local home improvement store so this would be a really cheap job if you already have the tools
Thompsons wood finish sealer was not used on this floor. We used a product called Gym Floor Finish. The cost was over $100 per gallon.
Donald davis fid you use a jointer and a plainer to size your wood to be the same??
Can you tell me what kind of nails did you use to nail these woods to the floor?
Hey Terri, if you check out the link at the bottom under the last picture (a building we shall go) they give you awesome step by step and very clear instructions for everything, including nail size and tools used 🙂
Sara,
Thanks for seeing the link and sending folks our direction.
This floor is the original work and design of A Building We Shall Go.
Regards,
Rancher Girl
Are the pallet boards run through a planer to get them all to one thickness and to remove splinters? It really does make a beautiful floor.
Sharon,
Yes, the boards were ran though a planer.
How many gallons of that finish did you need for what size room? I know you spent over $100 for a gallon so I wanted to know how many gallons you needed and the room size.
What’s that in litres so the rest of the world can understand your backward language?
Backwards language. How nice. Be a little less rude ok? Wow seeing some hateful commentary from people who are supposed to be all prim and proper. You people get uppity over every little thing. And here I thought we were all friends. Twatting yank, publish this and I agree.
@ ‘I agree’ : You obviously failed basic math in grade school! Google it or try this: 1 US gal lqd = 3.78541 L
Beautiful floor, but it’s not original and you are not the pioneers of it! That is not to take anything away from what is a considerable amount of work you’ve put in, I know, I’ve been restoring wood flooring for 15 years. Personally I would have used a 2-part water based varnish as the tech is years ahead of solvent based varnish now. Also, I’d use a Matt finish varnish as it is far more forgiving over time with wear and tear. Gloss just shows every scratch up in a very short period and tends to start looking tired really fast.
You’re also using a 90 deg nailer as opposed to a 45 (which would hide the nail heads). Personally I think that as pallett wood is so thin you would be better off using a flexible adhesive instead of nails.
To avoid splinters when floor is finished do not short cut the sanding process. Depending on the roughness of the planks you use you should start off with P24 then to P40, P60, then P80. This will give a nice smooth finish and the use of finer grit each passing will remove sanding scratches. Don’t jump from P24 to P80 and hoover after each grit grade.
Tip for anyone finishing off this type of floor, keep the fine sawdust from the sanding process and mix with a clear curing PVA glue. Mix into a thick paste and trowel into any gaps or existing nail holes. The sawdust will help to blend it into the surrounding wood when it dries.
Why is it that yanks think they’re the fuking pioneers of everything on this planet and are pretty incapable of accepting that sometimes they are wrong or that someone else knows better. Your refusing to publish my helpful and informative comments just show you to be yet another ‘up your own arse’ ‘USA USA USA bullshit we are best’ sad and shallow yank. Really, get a life and realise the world does not revolve around you shitty country.
Post this bitch!
Don’t get on an American post and talk shit about our measuring system! We must be pretty damn smart to come up with this idea and it’s very apparent that your country can’t think of this or you wouldn’t be asking us.We are not a country that just thinks about ourselves, we are one of the most giving countries in the world and we are always one of the first ones to run to the aide of another country. Don’t talk shit about us when asking for info!!
I agree with Twatting Yank, You lot ACTUALLY believe your own bull. You are THE most deluded humans on Earth. Jeez, you even think you can write in English correctly. But in point, it just goes to show how fragile and pathetic you all are if you are unable to share what is essentially POSITIVE criticism. Don’t think that you are the best at everything, you are FAR FAR FAR from it, BIG is all you got, stop being brainwashed, you are insignificant. Right I’m off to burn one of your shitty flags lol
Wow, just wow. And here I thought our country was a melting pot of all kinds of people and ideas. Remember all that when it’s one of your countries that holler first thing for U.S aide. 🙂
Screw you arrogant English assholes!
I luv it!
I just want to do it to prove to myself I can do this.
Thank you.
Think it could be installed in a basement over a concrete floor?
Bunch of haters here . Dick i don’t even know why you even bother. Sounds like there are some terrorists speaking in here.
TOTALLY INSPIRED!! Im a HUGE DIY/ChapSkate that has a cool old Country Style House, and this will look AWESOME throughout. Lots of works, and flaws are welcome!!
Should be no problem over a concrete floor you should do a vented raised subfloor first though
Could it be used on a bathroom floor? What about it getting wet…would water get under it?
I have been needed to do my kitchen floor over, but nothing ever felt right. I love this idea. My only question is could you recommend something durable for a finish? I have two dogs and would need to have something that would not scratch easily.
Is there a discussion board anywhere about anything that doesn’t erupt into hatred? Why are we, as a society of humans incapable of having a q & a about FLOORING for crying out loud? Anyway, the floor looks awsome, thanks for the idea, will mull it around a bit and see if we can do it in a cost effective way. Would love to reuse rather than buy new if possible. Great tip on the matte finish.
Thanks for the share, very helpful post for my upcoming DIY project.
trolls are everywhere, the world is full of stupidity. Never mind them they have nothing to offer.
Thanks for taking the time and effort to post this, we just placed 2500 square feet from pallets and its a very cost effective and BEAUTIFUL way to use what trolls throw away.
I recommend using a matt finish and saving and using the sandings to fill in the gaps, seamless and easy to do.
See Publish This January 1, 2015 at 2:45 pm above for details, we followed his great advice and are very happy with the results.
Thanks again for all the great info and ideas.
The floor is beautiful!
I hope to try it on one of my rooms!
Thanks for sharing your experience. It looks GREAT! Wow! We thought about doing pre manufactured flooring in our RV but decided to go with recycled pallet wood flooring instead. Check out our flooring install here https://www.youtube.com/watch?v=ueTKXvHT0vI. We are very happy with how it turned out! If you are interested in more RV renovation video, check out our YouTube channel @ http://www.youtube.com/DuetJustusVlogs.
So , where do you get the pallets from? How much are they?
Hi All,
Thanks for the comment and feed back.
Am in Africa Ghana and will like to have this excellent Floor as shown in the picture above.
Place do share with me the preparation of the floor before I kick start and also step by step procedures.
Help me do this project.
Best Regards,
Evans.
Funny that us twattee yanks sent your pompous asses packing,then pulled your pompous asses out of anhilation..what ever happened to your great empire..oh..never mind..another sore subject.